

Showing posts with label cookies. Show all posts
Showing posts with label cookies. Show all posts
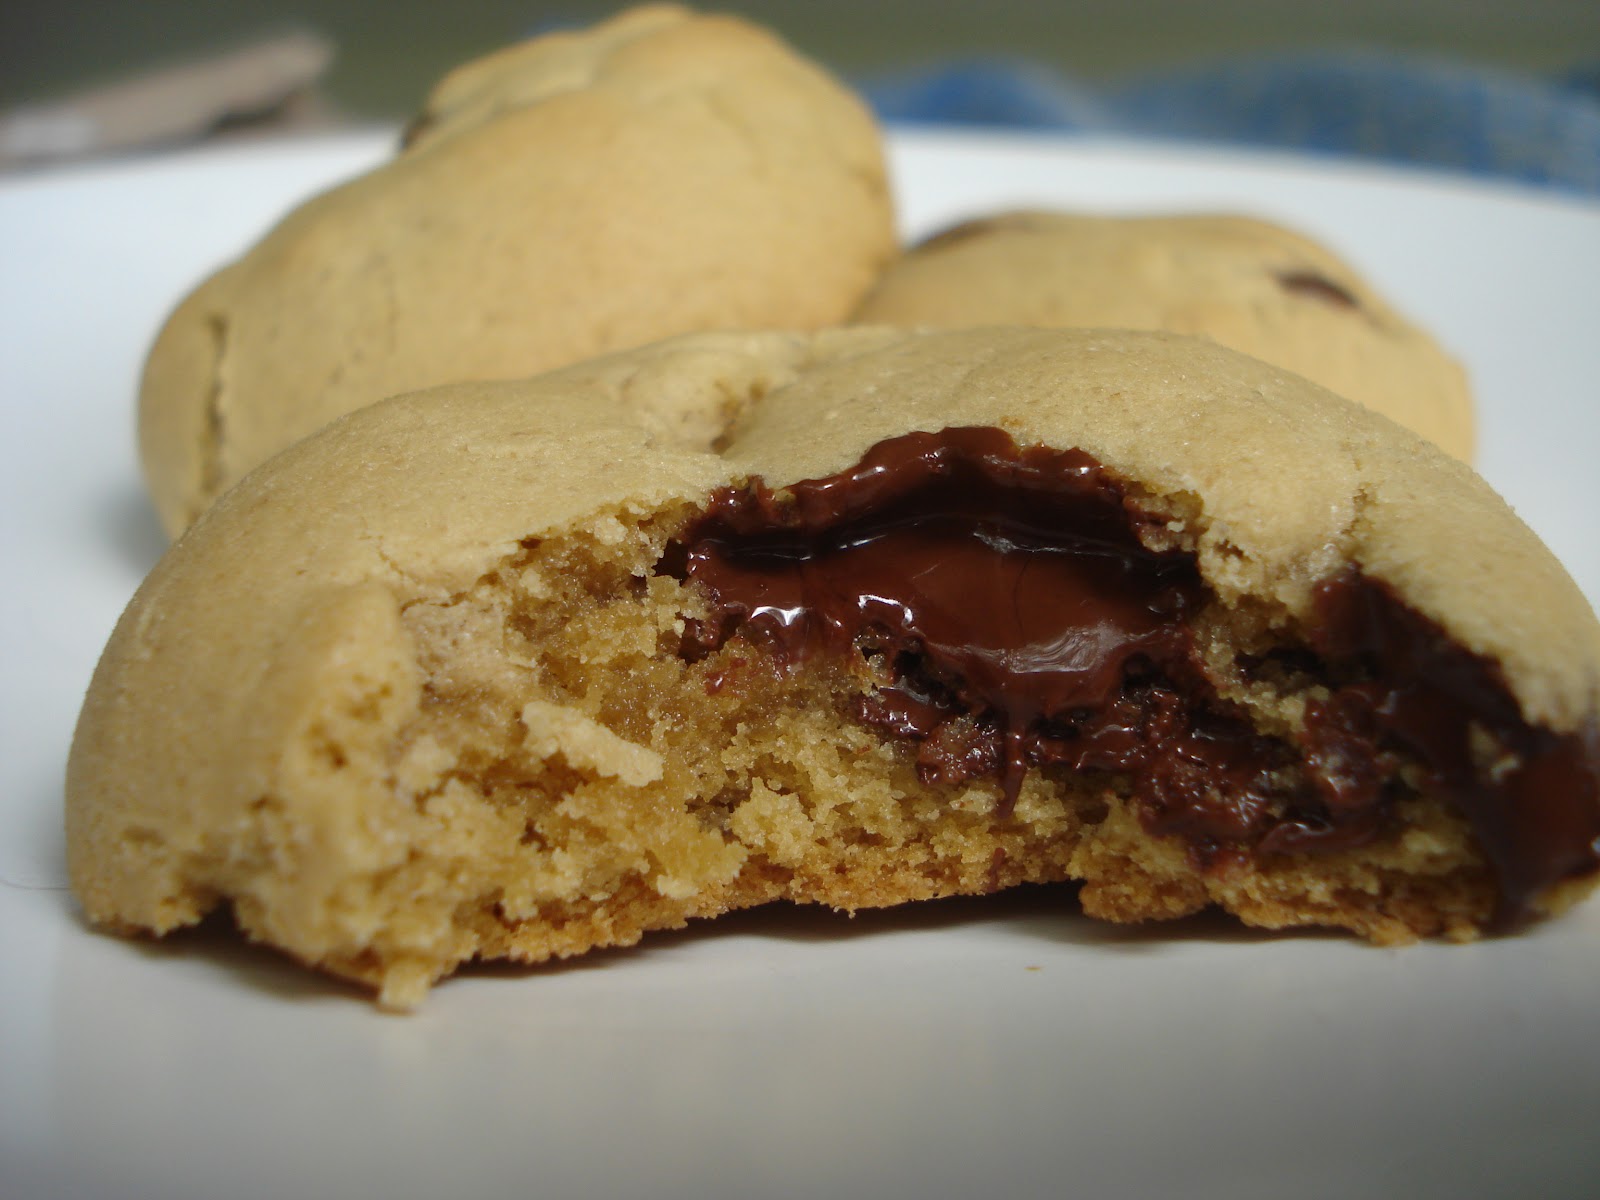
Salted Chocolate Chip Cookies
Monday, July 13, 2015
Walnut Brownie Cookies
Tuesday, July 22, 2014

Christmas Cookies Galore!
Friday, December 13, 2013
 |
| Sandwich Cookies |
 |
| Rum Balls |
 |
| Vanilla Bean Sugar Cookies |
 |
| Butterballs/Mexican Wedding Cakes/Russian Tea Cookies |
Vanilla Bean Sugar Cookies
Sunday, December 8, 2013

It’s week two of December and time for another round of Christmas cookies. These next ones are the perfect sugar cookies for cutouts. With the use of an actual vanilla bean to make the dough they have lots of flavor as opposed to the plain sugar cookie cutouts you’re probably used to.
Sandwich Cookies for Christmas
Sunday, December 1, 2013

Warning: If you make these cookies you’ll probably end up making them every year for the rest of your life.
Easter Surprise Cookies!
Wednesday, March 20, 2013

I can’t believe it’s almost Easter! How did that happen? It’s coming up in less than 2 weeks now so I’ve decided to pre-empt the Easter season and give you all this great recipe to try.
The 50th Post! (Chocolate Mudslide Cookies)
Sunday, January 20, 2013

Report: first chocolate craving of the day
time: 9:58 am.
Solution: 3 chocolate chip cookies
resolved: 10:01am
Cupcookies
Friday, September 14, 2012

Not cupcakes, not cookies, yes you read that right, cupcookies.
Lemon Sugar Cookies
Thursday, August 30, 2012

A few weekends ago it was a fabulous day in Santiago, not simply because of the weather, though it was a fairly nice winter day, but because a day at the market produced the most wonderful results. On a Saturday, I finally managed to make it out of the house at a reasonable hour, meaning there was time to go to La Vega Central, the huge fruit, vegetable, and all purpose market in the center of the city.
Orange Ricotta Cookies with Dark Chocolate
Monday, June 4, 2012

Several weeks ago, when my co-cook, Laura, and I started planning a menu for our previously mentioned picnic meal, I knew that I wanted to make Pasta Salad with Sun-Dried Tomatoes as my centerpiece. For dessert, I also knew I had to make something delicious and portable because, after all, you're more likely to take a cookie on a picnic than a rack of cupcakes or a pie. So I dug up my list of cookies to make and ran across these amazing Orange Ricotta cookies with dark chocolate drizzle. Just the name of these cookies was enough to elicit oohs and awws from the people who passed through the kitchen.
What's more, I was able to use local ingredients to make them. And when I say local, I mean outside our front door. Fortunately for me, my house boasts both an orange tree and a lemon tree simply laden with fruit this quarter. It was an awesome resource for our entire picnic meal and especially great for these light, summery cookies. As an aside, this recipe is great for a crowd, in fact just one recipe made enough cookies for my entire house of 40 so if you’re making for fewer people I suggest halving this recipe. Also, this recipe works with all kinds of citrus fruits so if you don’t have oranges but have lemons or grapefruits, don’t sweat it, just use those instead!
Orange Ricotta Cookies (lightly adapted from Two Peas & Their Pod)

Ingredients:
2 1/2 cups all-purpose flour
1 teaspoon baking powder
1 teaspoon salt
1/2 cup unsalted butter, softened
2 cups granulated sugar
2 large eggs
2 cups ricotta cheese
3 tablespoons fresh orange juice
1 orange, zested
Directions:
1) Preheat the oven to 375º F. Line a large baking sheet with parchment paper or a silicone baking mat. 2. In a medium bowl combine the flour, baking powder, and salt. Whisk until ingredients are combined. Set aside.
3) In the bowl of a stand mixer, or using a hand mixer, combine butter and the sugar. Beat the until light and fluffy, about 3 minutes. Add the eggs, one at a time, until incorporated. Add the ricotta cheese, orange juice, and orange zest. Beat to combine.
4) Stir in the dry ingredients. Spoon the dough (about 1 tablespoon for each cookie) onto the baking sheets. Bake for 12-15 minutes, until slightly golden at the edges. Remove from the oven and let the cookies rest on the baking sheet for 2 minutes. Transfer to a wire rack and cool completely.
Orange Glaze
Ingredients:
1 1/2 cups powdered sugar
3 tablespoons orange juice
1 cup chopped dark chocolate, melted
Directions:
1) Combine the powdered sugar and orange juice in a small bowl and whisk until smooth.
2) Spoon about 1/2-teaspoon onto each cookie and use the back of the spoon to gently spread.
3) Let glaze harden for about five minutes. Using a plastic bag with a small hole cut in the corner or a pastry bag, drizzle cookies with dark chocolate stripes.
Butterballs (also Mexican Wedding Cakes or Russian Teacakes)
Thursday, May 3, 2012
At the end of last quarter one of my friends was having a pretty hectic cook in our co-op and I decided to help him out a bit by making dessert. Knowing that we didn't have a lot of ingredients left at the end of the quarter I decided to go for a super simple cookie which would be quick to make. So I made these. It seems to have been a pretty great decision.
Almond Lovers Chocolate Chip Cookies
Sunday, April 15, 2012

Another of the cookies that my sister and I made on our marathon day of cookie making were these Almond Lovers Chocolate Chip Cookies. I had wanted to try them for some time and even tried to make them for my co-op but unfortunately, we couldn't get any almond paste. My guess is they don't sell it in bulk. Fortunately, my sister found it at the grocery store and were able to make these tasty cookies, plus a batch of them for her to freeze. In any case, I wanted to try them because I love almond flavored things, especially marzipan, which is essentially what the almond paste tastes like. Tearing the almond paste into chunks, we added it to these cookies. They were very good, but perhaps not as almondy as I had hoped. But, that doesn't mean you shouldn't try them. I would still make them again, just with a few alterations to make them have a stronger almond flavor. However, if you're alright with a very subtle almond flavor, make them as is without my following corrections. Maybe next time I'll add more almond paste, or almond extract instead of vanilla extract. I will also probably get some raw almonds and cut them into chunks to add to the cookies instead of the almond slices we had.
Almond Lovers Chocolate Chip Cookies (lightly adapted from Picky Palate)
Yield: 3 dozen cookies

2 sticks softened butter
3/4 cup granulated sugar
3/4 cup brown sugar
3 oz Odense Pure Almond Paste (package is 6 oz, can just be cut in half)
2 eggs
1 tablespoon vanilla
2 1/2 cups all purpose flour
1 teaspoon baking soda
1/2 teaspoon salt
12 oz bag chocolate chips
3/4 cup roughly chopped almonds
Directions
1) Preheat oven to 350 degrees F.
2) In a stand or electric mixer, beat the butter and sugars until well combined, light and fluffy. Add the almond paste in pieces until well combined. Add in eggs and vanilla until well combined.
3) In a large bowl combine the flour, baking soda and salt. Slowly add to wet ingredients along with the chocolate chips. Mix until just combined.
4) Drop by rounded tablespoon onto a silpat or parchment lined baking sheet. Bake for 10-12 minutes or until just golden crisp on the outside. Let cool on baking sheet for 5 minutes before transferring to a cooling rack.
Olive Oil Chocolate Chip Cookies
Thursday, April 5, 2012
One of the days I was visiting my sister in Georgia for Spring Break, we had a marathon cookie day. We made two different kinds of cookies and contemplated a third. The reason we decided to make so many was so my sister could freeze some dough for later. She's nine months pregnant now and due any day so likely, after her baby is born, she won't have much time for cookie making. But, with the frozen dough we made, she can just unfreeze and bake. In fact, cookie dough for just about any type of cookie (except madelines) can be frozen for between three to six months. What we ended up doing was separating the dough into equal portions, then we flattened it and wrapped it once in wax paper (so it wouldn't stick) and then wrapped it twice in plastic wrap. We then labeled the cookies with the name, date made, date good until, and baking instructions to make it super easy to just pull out a disk and bake up some cookies.
I thought her idea to do this was a pretty good one and I had some cookies in mind which I had been dying to bake. First on the list were Olive Oil Chocolate Chip cookies. While searching through food blogs some time ago, I somehow ran across this recipe and was really curious to try it. I was especially interested in these because they replace butter with olive oil, sounds healthier to me. As curious as I was though, I admit I was a bit wary about how these cookies would taste, especially when I was tasting the dough before baking. It had a slightly grassy flavor like the olive oil which my sister enjoys so much. At that point I sort of wished we had just used some plainer olive oil, like that “light in flavor” olive oil that I don't know why anyone would buy. However, I was pleasantly surprised when these cookies came out of the oven tasting nothing like olive oil. They were just like regular chocolate chip cookies, maybe even better. They were slightly puffy yet crunchy on the outside and pleasantly chewy on the inside. Perfect. I'll definitely be making these again. I say try them, besides, they're healthy for you!
Olive Oil Chocolate Chip Cookies (Lightly adapted from Culinary Couture)

2 1/4 cup flour
1/2 teaspoon salt
1 teaspoon baking soda
2 eggs
1/4 cup extra virgin olive oil
3/4 cup granulated sugar
3/4 cup brown sugar
1 teaspoon vanilla extract
1 cup chocolate chips
Directions:
1) Preheat oven to 375 degrees.
2) In a medium bowl, mix flour, salt and baking soda.
3) In a larger mixing bowl, beat eggs. Add olive oil and beat until completely mixed with eggs.
4) Add sugars, vanilla and mix until combined. Beat in dry ingredients slowly. Fold in chocolate chips, if using.
5) Drop by rounded teaspoon onto ungreased baking sheets using a tablespoon. Bake for 9 to 11 minutes until bottom of cookies are golden brown and the tops are pale blonde. Let stand for 2 minutes, then place on wire racks to cool.
Chocolate Chip Shortbread Cookies
Saturday, January 28, 2012

Making dinner for forty people is always an ordeal and this first cook of the quarter, was no exception. It took some time but I think the result was pretty darn good based on the reviews we received afterwards. We ended up with reviews like “this was my favorite meal of the quarter so far” and “dinner tonight was awesome!” and “Your food is always so good!” I even got demands for this recipe. But it was a close one, dinner could have gone either way, especially after a couple of emails telling us we wouldn't be able to get all the ingredients we wanted (no asparagus, no zucchini, pine nuts were outrageously expensive, no tahini etc) So a change of plans was called for. The risotto recipe had to change, we added in caramelized butternut squash (I will never do that for forty people again, peeling and cutting butternut squash, not fun) and these cookies. I'd say we ended up with a pretty delicious meal which consisted of barley risotto with broccoli and hazelnuts, caramelized butternut squash, hummus, salad, and these chocolate chip shortbread cookies.
I learned how to make them from my godmother a while back and they've been my go to cookie every since. They are literally the easiest cookies you could ever make (okay, almost). You don't need a mixer, you only need a few ingredients, and they're pretty difficult to mess up. I made them in Spain with less than ideal ingredients (try a bar of 1 dollar grocery store chocolate) for my co-workers at my internship, and lets just say the reviews were awesome. My co-worker raving about them was enough to send over a co-worker from the office next door saying he and all his office mates were drooling over the description. With that and the simplicity of the cookies, I knew that I would be making these for my co-op sometime this year. So after the difficulty of getting ingredients for the cookies we wanted to make, I turned to this simple recipe. Enjoy!
Chocolate Chip Shortbread Cookies (credit to my godmother, Monica, for this recipe)

2 sticks of butter, softened (226 gr de mantequilla)*
1 cup of confectioner's sugar (125 gr de azúcar glas)
1 teaspoon of vanilla (1 cucharadita de vainilla)
½ teaspoon of salt (½ cucharadita de sal)
2 ¼ cups of flour (225+ gr de harina)
1 cup of chocolate chips (175 gr de gotas de chocolate)
Directions:
1) Preheat oven to 375°F/190ºC.
2) Simply using a wooden spoon, cream together butter, confectioner's sugar, vanilla and salt in a large mixing bowl.
3) Mix in flour then add chocolate chips. Note that you may need to use your hands to thoroughly combine this dough since it tends to be crumbly
4) Roll dough into 1 inch balls, place on a cookie sheet, and press down about halfway with a fork. Bake for about 10-12 minutes or until the bottoms of the cookies are just barely golden
*Note: This recipe comes with ingredient conversions from when I was baking in Spain.
Lemon Butter Cookies
Sunday, November 6, 2011

Lemon Butter Cookies (adapted from The New York Times)
Yield: About 4 dozen cookies (or maybe 5 dozen if you make them as small as we did)

1 3/4 cups unbleached all-purpose flour
1 2/3 cups cake flour or more all-purpose flour (cake flour gives a finer texture)
1/2 teaspoon baking soda
1 teaspoon kosher salt
1 1/4 cups granulated sugar
1 cup (2 sticks) cold unsalted butter
2 packed teaspoons freshly grated lemon zest
1 large egg plus 2 large egg yolks, at room temperature
Directions
1. Position two oven racks in top and bottom third of oven. Preheat oven to 350 degrees. Line two cookie sheets with parchment paper.
2. In a bowl, whisk flours, baking soda and salt together. In a mixer, cream together the sugar, butter and orange zest at medium speed until light and smooth, about 3 minutes. Scrape down the sides of bowl frequently. Add egg and mix. Add one egg yolk and mix. Add remaining egg yolk and mix. Stir in dry ingredients just until combined.
3. Scoop tablespoons of dough onto parchment, leaving more than 1 inch between cookies. Press each one down lightly with 2 fingers to flatten to a thickness of 1/2 inch. Leave any ridges and valleys on top of cookie intact, but smooth the edges.
4. Bake about 15 minutes, rotating cookie sheets halfway through. Cookies should be pale but baked all the way through. Cool on sheets 5 minutes, then transfer to a rack and cool before storing in airtight containers up to 1 week.
Icing
Ingredients
1 lemon
1 1/2 cups confectioners’ sugar
2 to 4 tablespoons whole milk
2 drops almond or vanilla extract
Pinch fine salt.
Directions
1.Bring a small pot of water to a boil. Peel orange, being careful to remove only outer lemon zest, and cut into thin strips. Blanch in boiling water 1 minute; drain.
2.Sift confectioners’ sugar into a bowl. Whisk in 2 tablespoons milk. Whisk in more milk if needed to make mixture thin enough to spread.
3. Add extract, salt and zest, and whisk to combine.
4.Place cookies on a rack and drizzle icing over each one (make sure there is some lemon zest in each spoonful). Icing will settle into cookie crevices; let harden.
Note: Instead of icing, cookies can be sprinkled with coarse crystal sugar before baking.
Or you can do what we did and spread them with a thin layer of raspberry or blackberry jam.
Chocolate Shortbread Sandwich Cookies with Vanilla Frosting
Monday, October 31, 2011

My friend, Micah, concluded the other day that if I ever have a significant other and fight with him, our fights will go something like this "No, insert name, you're not frosting those cookies right". I didn't dispute his claim then and I certainly can't dispute his claim now because that's exactly what happened to Micah when I was making these cookies. Poor Micah, he was just trying to help. But I, as always, wanted my cookies made exactly according the the recipe, down to the round cookies which are shown in the picture. The idea of making round cookies with few kitchen supplies brought up yet another kitchen gadget I need to invest in. Cookie cutters. Oh well, I got by anyway using the round top of my newly purchased vanilla bean paste and a knife to cut circles around it. To my shock and pleasure the cookies came out pretty well, nice and round. And I filled them with frosting just the way I wanted them. And I must say, it looks a little better to have piped the frosting into the middle of these cookies than to have spread it. Plus it was more fun. For me at least. Sorry Micah.
A note on the frosting, though it calls for just a small amount of butter and if the butter is not completely melted, this will not turn into frosting. Just chunks of butter and confectioners sugar. Normally, I would have added a bit of milk to it to make it work but having no milk in the house I had to add some extra melted butter. (I know I know, more butter, not good) But, after that, it turned out just fine. Also, aside from using the top of the vanilla paste I recently bought, is used it to make this frosting amazingly delicious and vanilla-y. It also lent flecks of vanilla to the frosting which are hard to make out in the picture but looked really nice, and gives the impression that you used a real vanilla bean. I highly recommend it.
I also want to add that the perks of working for a winery just never end, I found this recipe on the website of another winery which I wouldn't have know about otherwise. On their website they have all kinds of delicious looking gourmet recipes with beautiful pictures and selections for wine pairings, though you should really try to pair your creations with our Kingston Family Vineyards wines! (Shameless plug)
Chocolate Shortbread Sandwich Cookies with Vanilla Frosting (adapted from Robert Sinskey)

1 stick unsalted butter, room temperature
1/2 cup powdered sugar, sifted
1/2 teaspoon pure vanilla extract
1/3 cup Dutch processed or natural cocoa powder, sifted (I think we may have just used Hershey's)
3/4 cup all-purpose flour
1/2 teaspoon kosher salt
Directions:
1. Preheat the oven to 350 degrees F.
2. In a stand mixer, fitted with a paddle attachment, or just using a regular hand mixer, ream the butter until fluffy, about 3 minutes. Add the powdered sugar and beat until fluffy again. Add the vanilla extract to the mixture and then the cocoa powder. Beat until combined.
3. Scrape down the sides of the bowl. Add the flour and salt and mix gently until incorporated. The dough will be very soft and slightly sticky. Knead the dough two or three times on a lightly floured board to incorporate all the ingredients. Wrap the dough in plastic wrap and chill for 40 minutes or until no longer soft.
4. Remove the dough from the refrigerator. Place the dough on a floured surface and roll 1/8 thick. (Though this may seem extremely thin, it's important because the cookies will puff up and if you make them too thick you'll end up with super fat sandwich cookies instead of the thin, delicate ones pictured here) Using a round cookie cutter, punch out shapes. Transfer to a parchment lined sheet pan.
5. Bake for 12 to 15 minutes . Remove the cookies from the baking sheet and cool on a rack.
6. Make sure the shortbread is thoroughly cool before filling. To fill, put the vanilla cream filling into a pastry bag with a number 6 plain tip or a plastic bag with the tip of a corner cut off so that the opening is 1/2-inch wide.
6. Line up 16 cookies so that the side that was baked against the pan is facing up. Starting with one cookie, pipe a thick ring about 1/8 of an inch from the edge of the cookie. Fill in the center of the ring with a dot of filling and place another cookie on top of the filling. Press lightly until the filling oozes almost to the edge of the cookie. Repeat with the remaining cookies.
Vanilla Cream Filling
Ingredients:
4 tablespoons (1/2 stick) unsalted butter, room temperature
1/2 teaspoon pure vanilla extract (I used some vanilla paste)
1/8 teaspoon kosher salt
1 cup plus 2 tablespoons powdered sugar
Directions:
1. Place all the ingredients in the bowl of a stand mixer fitted with a paddle attachment.
2. Start on slow speed to combine the ingredients, and then increase the speed to high and beat until the filling is very white and fluffy, 3 to 4 minutes.
3. Place the filling in a piping bag or plastic zip lock bag with the corner cut off to pipe into cookies. The leftover filling may be chilled and reused again. Wrap very tightly and store in the refrigerator. To reuse, bring to room temperature and then whip until fluffy again.
Chewy Chocolate White Chocolate Chunk Cookies
Thursday, September 22, 2011

It was a long Sunday at work and all I wanted to do was sit down. But Micah reminded me that we had lots of ingredients to get through before the end of the summer when my friends move out of their house and go home for the month before school starts. We started halfway through the summer with a ten pound bag of sugar which Micah invested in. Sadly got down to just three or four pounds. I'd like to say that lots of it was wasted on experiments that went wrong but I'd guess that those uneaten experiments account for just 4 or 5 cups of that sugar. At the most. Meaning we consumed the rest and are still continuing to consume it.
Fortunately, it was not I who was eating these cookies but my coworkers. I decided that since my boss is always bringing in food for us (and I am always eating it) that I should bring something for my coworkers. After all, I bake all the time, why not? So I took about 14 cookies (which sparked outrage from Micah who thought I was stealing all his cookies) and which made me think that with just three other coworkers I would have enough after work to take home to my aunt and even take some to another friend. Wrong. These cookies were devoured. My boss marveled at the texture of them and a coworker asked me if they were from a box. To which my boss said, “I'm really good at making those slice and bakes, I know exactly how long to bake them for.” Sigh. Someone needs to teach him how to cook. In the mean time, I think I'll try to keep bringing cookies.
These are super dense chocolate cookies even without using Dutch press cocoa or the Hershey's special dark cocoa powder that some other bakers like the Brown Eyed Baker or Two Peas and their Pod suggest but the white chocolate chips seemed to balance the chocolate out nicely.
Chewy Chocolate White Chocolate Chunk Cookies
Ingredients

1 teaspoon baking powder
1/2 teaspoon salt
2/3 cup dutch-process cocoa* ( we used regular Hershey’s)
1/2 cup (1 stick) unsalted butter, cubed and room temp
1/2 cup white sugar
1/2 cup dark brown sugar
1-1/2 teaspoons vanilla
1/3 cup milk
1-1/2 cups chopped white chocolate (we used white chocolate chips)
*Substituting with natural unprocessed cocoa is not recommended. The Oreo-like flavor comes from the richer dutch-processed cocoa. (We didn't really care about the oreo cookie flavor so we just skipped the expensive dutch press cocoa and used Hershey's, we're college kids, come on.)
Directions
1)Preheat oven to 325 degrees F and line baking sheets with silicone baking mat or parchment paper.
2)Whisk together flour, salt, baking powder and cocoa, and set aside. Beat the butter on medium-high until light and add sugars, creaming well. Add the vanilla and beat until smooth. Add the flour mixture in 2 batches, alternately with the milk in one batch, mixing well. Chill dough for 15 minutes.
3)Scoop the dough onto a parchment (yeah parchment! great investment)- or silpat-lined cookie sheet, press down on them slightly, and bake for 13-15 minutes. Let the cookies cool completely on the cookie sheet and store in an air-tight container.
4) Share with coworkers! (and don't plan to have leftovers)
World Peace Cookies (And the run to the finish in the summer cookie spree)
Friday, September 16, 2011

A couple of Sundays ago, I returned home to my friend's house to find them all playing video games (surprise!) and joined them in sitting on the couch. Then suddenly the video games became a truly awful movie which sadly featured James Franco, Natalie Portman, and Zooey de Chanel, among others. Not wanting to watch it, and instead wanting to take advantage of all the ingredients we had to use up in my friends' summer house before they move out, I was relieved when Micah asked if I would want to make something. “You don't want to watch this?” I asked laughingly, to which I received a look which clearly said, no. Heck no. So we left the showing of the dreadful movie and go to work on these World Peace Cookies.
After making these cookies, I'm really unsure as to why we were not constantly stocked with parchment paper this summer. For the first time all summer, the bottoms of our cookies were not burned, even with our not so good baking sheets. It was amazing! All thanks to Simon who had the impulse to make toffee and ended up purchasing not just parchment paper but a candy thermometer. Now maybe we can make the delicious Brown Sugar buttercream frosting my sister told me about or even tempered chocolate for these amazing looking chocolate cups we've been wanting to make! Anyway, back to these cookies. So while I don't quite think they'll bring world peace with their deliciousness, they were pretty good and as Micah said, it was just what he wanted.
A note: Though it says you should refrigerate these for 3 hours before slicing and baking, in our eagerness to eat these cookies we skipped this step and simply made the cookies of flattened down balls of dough. (Lets be real, Micah wanted his chocolateness and he wanted it now so he put these cookies in the freezer to cool them down faster). Despite our shortcut methods, they still tasted delicious to me and I liked the fact that they didn't have the store-bought slice and bake look of the cookies when I made them last summer. Plus we got to eat them sooner. Win on all fronts.
World Peace Cookies (found in many locations on the web but we found it here)
Ingredients

1/3 cup unsweetened cocoa powder
1/2 teaspoon baking soda
1 stick plus 3 tablespoons (11 tablespoons) unsalted butter, at room temperature
2/3 cup (packed) light brown sugar
1/4 cup sugar
1/2 teaspoon fleur de sel or 1/4 teaspoon fine sea salt (this is essential)
1 teaspoon pure vanilla extract
5 ounces bittersweet chocolate, chopped into chips, or a generous 3/4 cup store-bought mini chocolate chips (we used regular chocolate chips and it worked fine though I suppose if you're slicing these it might be better if they're smaller...)
Directions
1) Sift the flour, cocoa and baking soda together. (I'm always too lazy to sift so I skipped the sifting and just mixed these dry ingredients together before adding them in step 3)
2) Working with a stand mixer, preferably fitted with a paddle attachment, or with a hand mixer in a large bowl, beat the butter on medium speed until soft and creamy. Add both sugars, the salt and vanilla extract and beat for 2 minutes more.
3)Turn off the mixer. Pour in the dry ingredients, drape a kitchen towel over the stand mixer to protect yourself and your kitchen from flying flour and pulse the mixer at low speed about 5 times, a second or two each time. Take a peek — if there is still a lot of flour on the surface of the dough, pulse a couple of times more; if not, remove the towel. Continuing at low speed, mix for about 30 seconds more, just until the flour disappears into the dough — for the best texture, work the dough as little as possible once the flour is added, and don’t be concerned if the dough looks a little crumbly. Toss in the chocolate pieces and mix only to incorporate.
4) Turn the dough out onto a work surface, gather it together and divide it in half. Working with one half at a time, shape the dough into logs that are 1 1/2 inches in diameter. Wrap the logs in plastic wrap and refrigerate them for at least 3 hours. (The dough can be refrigerated for up to 3 days or frozen for up to 2 months. If you’ve frozen the dough, you needn’t defrost it before baking — just slice the logs into cookies and bake the cookies 1 minute longer.) (As previously mentioned, we were too lazy to do this)
Baking preparations
1) Center a rack in the oven and preheat the oven to 325 degrees F. Line two baking sheets with parchment or silicone mats.
2) Using a sharp thin knife, slice the logs into rounds that are 1/2 inch thick. (The rounds are likely to crack as you’re cutting them — don’t be concerned, just squeeze the bits back onto each cookie.) Arrange the rounds on the baking sheets, leaving about 1 inch between them.
3) Bake the cookies one sheet at a time for 12 minutes — they won’t look done, nor will they be firm, but that’s just the way they should be. Transfer the baking sheet to a cooling rack and let the cookies rest until they are only just warm, at which point you can serve them or let them reach room temperature. (or put them in the freezer if you're impatient...)
Chocolate cookies with grapefruit and star anise
Thursday, August 25, 2011

It was fate. I went home for my mom's birthday and she just happened to have star anise which I had been looking for since I saw this recipe back in February and then when I came back to California, I walked into my aunt's house to be greeted by a large grapefruit. I first thought it was a pomelo because of its size but it was grapefruit colored and then my aunt confirmed that indeed it was a massive grapefruit. The two main ingredients I had been looking for to make these cookies had simply fallen into my lap. So with my aunt out of town I asked my friends if they wanted to make dinner of Gnocchi parsisienne and then decided I would make these cookies from The Bitten Word.
While I (predictably) overcooked these cookies at first, I would suggest undercooking them because it keeps them moist and bursting with flavor. I recommend, if your friends are of the picky type, not telling them what's in these cookies. If they're picky the ingredients (namely star anise with it's licorice flavor) might turn them off. However, without knowing the ingredients, one of my friends asked if there was some raspberry in there. Yum. That being said, I don't think these cookies are for everyone since the flavor is quite unique but if you stumble on some star anise and already have a spice grinder, (which I didn't and had to make a run to the store to buy one) then I would try making these these cookies.
Chocolate cookies with grapefruit and star anise
Ingredients
8oz bittersweet chocolate, finely chopped

1 teaspoon plus ¼ cup sugar
3 whole star anise (this produces a pretty intense flavor I might use 2 instead)
¼ cup all purpose flour
1 tablespoon unsweetened cocoa powder
½ teaspoon coarse kosher salt
¼ teaspoon baking powder
2 large eggs
2 tablespoons honey
2-4 teaspoons finely grated grapefruit peel
Directions
1) Combine chocolate and butter in medium microwave-safe bowl. Microwave in 10-second intervals until chocolate is almost melted; remove and stir until melted and smooth. Finely grind 1 teaspoon sugar and 3 star anise in spice mill or small coffee grinder. Transfer to small bowl; whisk in flour, cocoa, coarse salt, and baking powder.
2) Beat remaining 1/4 cup sugar, eggs, honey, and grapefruit peel in large bowl until thick and smooth. Fold in chocolate, then dry ingredients. Cover bowl; chill batter until cold and firm, at least 45 minutes and up to 1 day.
3) Preheat oven to 375°F. Line 3 large baking sheets with parchment paper. Drop batter by tablespoonfuls onto prepared sheets, spacing mounds 2 inches apart.
4) Bake cookies, 1 sheet at a time, until dry-looking and tester comes out with moist crumbs still attached, about 10 minutes. Cool on sheet 3 minutes, then transfer to racks and cool completely. DO AHEAD Can be made 1 day ahead. Store airtight between sheets of waxed paper
I actually think these cookies would be better with a regular cookie dough instead of chocolate. That would be an interesting thing to try...
Picnic Morsels
Saturday, August 6, 2011
So these tiny picnic morsels which I found on Cakespy have been on my list to make since last summer and they didn't disappoint once I finally got together all the ingredients to make them. I thought they would be rather ordinary cookies just piled with different ingredients but they were pretty good to me because of the brown sugar. This recipe uses only brown sugar and maybe it's our terrible pans but I found the brown sugar somewhat caramelized on the bottoms of these cookies adding yet another dimension of flavor to these simple little things. I also liked that they were small and bite sized but, that could be a dangerous thing too...
Picnic Morsels

Ingredients
1 2/3 cups regular flour
1/2 teaspoon baking soda
3/4 cup melted butter
1 cup packed brown sugar
1 teaspoon vanilla extract
1 egg
2/3 cup white chocolate chips
2/3 cup milk chocolate chips
3/4 cup chopped almonds
3/4 cup dried apricots, choppedDirections
1. Preheat oven to 350 degrees.
2. In a medium bowl, stir together the flour, baking soda, and salt. In a large bowl, stir in the butter and sugar until smooth. Beat in the egg and vanilla. Stir in the dry ingredients until well blended, then add the chips, almonds, and apricots.
3. Drop dough by rounded teaspoonfuls onto an unprepared cookie sheet. Bake for 10 to 12 minutes in the preheated oven. Cookies should be golden brown. Remove from the baking sheet to cool on wire racks.
4. Enjoy, preferably at a picnic.