Chocolate Chip Shortbread Cookies

Saturday, January 28, 2012


Making dinner for forty people is always an ordeal and this first cook of the quarter, was no exception. It took some time but I think the result was pretty darn good based on the reviews we received afterwards. We ended up with reviews like “this was my favorite meal of the quarter so far” and “dinner tonight was awesome!” and “Your food is always so good!” I even got demands for this recipe. But it was a close one, dinner could have gone either way, especially after a couple of emails telling us we wouldn't be able to get all the ingredients we wanted (no asparagus, no zucchini, pine nuts were outrageously expensive, no tahini etc) So a change of plans was called for. The risotto recipe had to change, we added in caramelized butternut squash (I will never do that for forty people again, peeling and cutting butternut squash, not fun) and these cookies. I'd say we ended up with a pretty delicious meal which consisted of barley risotto with broccoli and hazelnuts, caramelized butternut squash, hummus, salad, and these chocolate chip shortbread cookies.

I learned how to make them from my godmother a while back and they've been my go to cookie every since. They are literally the easiest cookies you could ever make (okay, almost). You don't need a mixer, you only need a few ingredients, and they're pretty difficult to mess up. I made them in Spain with less than ideal ingredients (try a bar of 1 dollar grocery store chocolate) for my co-workers at my internship, and lets just say the reviews were awesome. My co-worker raving about them was enough to send over a co-worker from the office next door saying he and all his office mates were drooling over the description. With that and the simplicity of the cookies, I knew that I would be making these for my co-op sometime this year. So after the difficulty of getting ingredients for the cookies we wanted to make, I turned to this simple recipe. Enjoy!

Chocolate Chip Shortbread Cookies (credit to my godmother, Monica, for this recipe)

Ingredients:
2 sticks of butter, softened (226 gr de mantequilla)*
1 cup of confectioner's sugar (125 gr de azúcar glas)
1 teaspoon of vanilla (1 cucharadita de vainilla)
½ teaspoon of salt (½ cucharadita de sal)
2 ¼ cups of flour (225+ gr de harina)
1 cup of chocolate chips (175 gr de gotas de chocolate)

Directions:
1) Preheat oven to 375°F/190ºC.
2) Simply using a wooden spoon, cream together butter, confectioner's sugar, vanilla and salt in a large mixing bowl.
3) Mix in flour then add chocolate chips. Note that you may need to use your hands to thoroughly combine this dough since it tends to be crumbly
4) Roll dough into 1 inch balls, place on a cookie sheet, and press down about halfway with a fork. Bake for about 10-12 minutes or until the bottoms of the cookies are just barely golden

*Note: This recipe comes with ingredient conversions from when I was baking in Spain.

Champagne Punch

Tuesday, January 17, 2012


Since it was the first weekend of the quarter we, naturally, had a progressive in our co-op to get to know our new housemates and catch up with old ones.  The theme this time was “Decades” meaning that each room had to represent a different decade.  My roommate and I decided to be the 1920's because we could dress like flappers and play classy music.  I also happened to have a flapper sort of dress and wanted to wear it, so we settled on that.  Seeing as it was a classy sort of era (aside from the bathtub gin and probably grimy speakeasies) we decided on a glamorous drink that was probably totally wrong for the age, Champagne Punch.

Regardless, the drink was still really good and we got tons of compliments on its deliciousness.  My roommate and I now think it will be our go to drink for any party.  The other great thing about it is that although it requires a lot of ingredients, it makes a lot of punch, and it can be made with cheap ingredients (cheap champagne, cheap pineapple juice, cheap chambord, on sale ginger ale, etc) and it still tastes really good!  But, if you want it to be super classy, you can use all the expensive versions of the ingredients it calls for.  It really is a very versatile and tasty drink.  One final note, the color is, well, probably not the most appetizing, so if it's worrysome to you, try adding a couple drops of red food coloring and you should have a nice punch color.  I think I'll try that next time...

Champagne Punch (lightly adapted from Gourmet)

Yield: about 16 cups or 12 servings

Ingredients: 
1 cup Triple Sec
1 cup brandy
1/2 cup Chambord (raspberry liquor)
2 cups unsweetened pineapple juice
1 quart chilled ginger ale
2 chilled 750-ml. bottles dry champagne

Directions: 
1) In a bowl combine the Triple Sec, the brandy, the Chambord and the pineapple juice and chill the mixture, covered, for at least 4 hours or overnight.
2) In a large punch bowl combine the Triple Sec mixture, the ginger ale, and the champagne and mix.
3) Serve over ice in classy glasses and enjoy!

Rum Balls (YUMMMMMM)

Tuesday, January 10, 2012


Okay, so I know that Christmas is over and I should have posted my recipes for Christmas cookies beforehand (trust me, I had plans to but...things got a bit busy) however, these are some of my favorites and I wanted to post the recipe.  Plus, I think these could be cookies for other times of the year.

Red Velvet Cake Balls

Monday, January 2, 2012


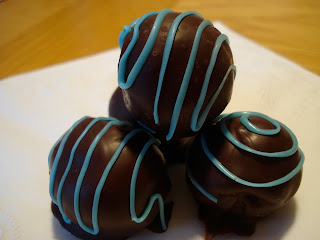
I learned a lot of things over this winter break.   One of them is that baby showers are a lot of work to do well.  Making cake balls added a bit to that difficulty.  It was my third, maybe fourth time making cake balls and I had never made them from scratch before.  That is to say, I had never made a cake with the intention of crumbling it to pieces to make cake balls.  But, I had told my sister I would do such a crazy thing and decorate them in either blue or pink, dependent on the sex of her baby.  As luck would have it, blue became the color to decorate in.  So I, in a moment of brilliance, decided that the cake inside the cake balls should also be blue. Blue velvet cake as a matter of fact, since I already had a recipe for red velvet cake.

And so I learned my second lesson of break, there are reasons why people make red velvet cake and not blue velvet cake. First off, they don't sell huge bottles of blue dye at the grocery store. They sell red, they sell green, they sell yellow in the large 2 oz bottles you need for red velvet cake. And finally, they sell black.  Not blue.  Black.   Ridiculous.  Who dyes frosting or cakes black? That's just unappetizing. So I had to settle for buying a second set of red, yellow, green, and blue dyes in .25 oz containers.  In all, I had maybe .5 oz to dye a large cake blue.  It was in this way that I learned why you don't really see many blue velvet cakes around.  As it would happen, chocolate wants to turn red, not blue.  It seems obvious, but really, I thought it would be easier to make blue velvet cake than it was.  I eventually got blue velvet cake by adding highly concentrated gel dye, but it was a darker blue than I was envisioning.

Oh well, you live, you learn and because they're delicious, people still eat your funny looking blue velvet cake balls.

*Red Velvet Cake (lightly adapted from eatfirst)
Ingredients
1/2 C unsalted butter, softened
1 1/2 C granulated sugar
2 eggs
1 C buttermilk
1 oz red food coloring (I recommend sticking to just red!)
1 t vanilla extract
1 1/2 t baking soda
1 T distilled white vinegar
2 C all purpose flour
1/3 C unsweetened cocoa powder
1 t salt

Directions
1) Preheat oven to 350F.  Grease an 11 x 7 inch pan.
2) In a large bowl, beat butter and sugar with electric mixer until light and fluffy. Add eggs, buttermilk, food coloring and vanilla. Stir in baking soda and vinegar.
3) Combine flour, cocoa powder, and salt. Stir into batter until just blended.  Spread evenly in pan.
4) Bake for 25-30 minutes.

*Even though I would highly recommend this red velvet cake for making cake balls, I'm not sure I'd make it to eat on its own, every time I've made it, it's taken forever to bake on the inside and almost burns on the outside. It's fine for cake balls though!

Cream Cheese Frosting (also from eatfirst)
Ingredients
16 oz cream cheese at room temperature
1/2 C (1 stick) butter at room temperature
1 t vanilla extract
2 C sifted confectioners’ sugar

Directions
1) In a large bowl using an electric mixer, beat the cheese and butter until soft and smooth.
2) On low speed, beat in the vanilla and sugar, then beat on high speed for a few minutes until smooth.

Red Velvet Cake Balls (adapted from Bakerella)
Yield: 80 small or 60 large cake balls

Ingredients
One 11 x 7 inch red velvet cake (see above cake recipe)
16 oz of cream cheese frosting (see above frosting recipe)
24 oz of chocolate, separated (milk, white, or dark chocolate)
Parchment paper
Directions
1. Cool cake completely and crumble into a large bowl.
2. Add 16 oz of cream cheese frosting, or less if you want a more cake-like texture to the cake balls, and mix with the cake. You'll need to end up mixing it with your hands. Even though it's messy, it ensures the
3. Roll mixture into 1 inch balls, as though you're making meatballs, and place on cookie sheet lined with parchment paper.
4. Chill for several hours in the refrigerator. Do not put them in the freezer or they will be too hard and may get frost on them, which is not good when it unthaws inside it's chocolate shell.
5. Using a double boiler, melt enough chocolate to dip 1/3 of the balls in chocolate, about a cup. Then, melt more chocolate for the rest of the chocolate balls. (I like to melt it in a few batches because the chocolate firms up pretty quickly and then it's difficult to work with)
6. With a spoon, roll balls of cake in melted chocolate and lay on cookie tray with parchment paper until firm.
7. Store in a plastic container and refrigerate up to a week.