Eggplant Bruschetta

Monday, December 26, 2011


I meant to write about my last cook of the quarter and the beautiful results from it, but haven't had the chance with finals, Christmas, and my sister's baby shower (so exciting!! Much more about that later).  But, now that I have time, I wanted to focus on a couple of recipes from the amazing meal that my housemate and I made.

It was our final cook of the quarter and we were determined to make up for our previous cook (let's just say that our previous meal didn't exactly go as planned).  Determined to make up for it, we decided on a meal which consisted of beef brisket, flatbread with honey and thyme, mashed potatoes, salad, eggplant bruschetta, and a Bulgarian pastry with cottage cheese.

You may be thinking, “wow, that's a lot of food”, and honestly, it was about enough food to feed our house of 40 plus some.  We really wanted to make sure we didn't run out of food.  Yet despite the vast quantities, we managed to make a pretty delicious meal.  One of the dishes which was particularly loved was actually our vegetarian option.  We (with our mass amounts of food) ended up having enough eggplant bruschetta for everyone to try it, and they gave us tons of compliments on it.  Here's the recipe so you can try it out for yourself!

Eggplant Bruschetta (adapted from the Smitten Kitchen)

Yield: About 4 salad/appetizer portions, assuming people will eat 2 rounds apiece.

Ingredients:
2 to 3 tablespoons plus 4 teaspoons olive oil
1 1/2 pounds eggplant (about 2 medium), cut into 3/4- to 1-inch slices
2 ounces (1/2 cup) feta cheese
2 tablespoons capers, drained
1/3 cup finely diced red onion
3 seeded, diced medium tomatoes (1 1/2 cups)
3 tablespoons minced fresh mint leaves
2 teaspoon red wine vinegar plus a bit more
Freshly ground black pepper

Directions:
1) Preheat oven to 425ºF.
2) Finely dice the 1/3 cup of red onion and place it in a small bowl.  Soak the onion in red wine vinegar, just to cover.  Let sit until you assemble the salad. This is intened to soften the onions a bit and make the onion flavor a little less intense, (especially important if you're like me and don't like raw onions).
3) Coat a large baking sheet generously with olive oil, 2 to 3 tablespoons. Arrange eggplant rounds in a single layer. Sprinkle with salt and freshly ground black pepper.
4)Roast, without disturbing, for 15 to 20 minutes. Flip each piece: the undersides should be blistery, dark and a bit puffy and should release from the pan with no effort. If they don't look this way, allow them to cook longer. Once flipped, sprinkle them with additional salt and freshly ground black pepper and return the pan to the oven for another 10 to 12 minutes or so, until the undersides match the tops.
5) Meanwhile, mix your feta cheese, capers, onion*, tomatoes, mint, vinegar and remaining 4 teaspoons olive oil in a small bowl. Taste for seasoning; feta cheese tends to be quite salty so this dish shouldn't need any salt.  Add freshly ground black pepper, to taste.
6) When the eggplant discs are done, arrange them on a serving platter. Scoop a spoonful of the salad over each round. Eat immediately.

Tortilla de patata or Spanish tortilla

Sunday, December 18, 2011


It's been a while since I've written a blog post and I suppose that's a good thing since it means I was studying hard for finals.  But, now that they're over, I wanted to post the recipe for something which is (finally) a non baked good and Spanish.  I did, after all, study in Spain for six months and take a cooking class while there.   In fact, I got the recipe for Spanish tortilla from the cooking school we went to as a group in Madrid.  The only problem is, it's only a good recipe in terms of portions. The real reason I know the whole procedure for making them is the maid who came to my host mom's apartment every couple of weeks.  My host mom insisted they were the best so one day I decided to watch how she did it.

Since then, much to my surprise, I've found cause for making tortilla española fairly often. Like a large and very thick omlette made with potatoes and eggs, the Spaniards often cut it into small slices or squares and eat it for tapas.   It is also very common for it to be made at home and simply eaten as part of the meal.   My first opportunity to make it came when my housemate, Charlie, and I prepared Spanish food.  Our meal was Spanish from start to finish and consisted of paella (vegetarian and meat), tortilla española, and arroz con leche.  Then, since I am also a Student Advisor for the Madrid Study Abroad program, my fellow SA and I purchased tortilla española or tortilla de patata (that's what they call it in Spain) for our cultural orientation.  However, for our final event of the quarter before the Madrid group goes abroad for the the winter, Nick and I decided to try our hand at making the tortilla. The results were quite good and it's not as difficult to make as you might think. The hardest part is flipping the tortilla (a fact Nick discovered when he dropped one on the floor) so I would recommend using a small, very non-stick pan to flip.  Otherwise, you'll end up with tortilla on your floor or stuck to your pan.

Tortilla de patata or Tortilla española (Recipe translated and lightly adapted from Cocina Cayena)
Yield: about 2-3, 9-inch tortillas

Ingredients
2.5 pounds of potatoes (brown russet potatoes work fine for this)
8 eggs
1 onion
3 cups of extra virgin olive oil
salt to taste
pepper (optional)

Directions
1) Peel and wash the potatoes. Using the widest opening of a box grater, grate the potatoes into thin slices. Set aside. Next, slice the onion into thin strips.
2) Combine the potatoes, onion, and salt in a large pan and add olive oil almost to cover. (I know, it looks like a heart stopping amount of olive oil, but trust me, it's necessary. And besides, no one ever said this was a healthy recipe, though I bet you didn't know it was this bad for you!) Stirring often, allow the potatoes and onions to simmer in the olive oil for about 30 minutes or until potatoes are tender.  Stir occasionally to make sure the potatoes and onions don't stick to the pan
3) Once cooked, dump the potatoes, onions, and obscene amounts of olive oil, into a paper-towel lined colander to drain.
4) In a large bowl (large enough to combine the eggs and the potato mixture) whisk 8 eggs with some pepper to taste. Though the Spanish would never use pepper since they can't handle even the remotest bit of spice, I like to add a bit.
5) Add the drained potatoes a bit at a time to the eggs, careful not to cook the eggs as the potato mixture will still be hot. Mix well.
6) In an 8 or 9 inch non-stick skillet (really make sure it's non-stick!!), heat a tablespoon of olive oil over medium heat. Swirl skillet to coat.
7) With a ladle, add about 1/3 of the egg and potato mixture to the pan. Stirring very slightly in the middle (be sure not to break through the bottom layer) continue until the egg is cooked about halfway through along the edges.
8) Using a large plate, cover the pan and carefully but quickly flip the tortilla onto the plate. Then very carefully slip it back into the pan, uncooked side down.  Return to flame.
9) Continue cooking over low to medium heat until it is cooked through.
10) Once it's done, slip it onto a large plate. Make the other 1 or 2 (depending on the size of your pan) and cut into squares or slices to serve.  

Chocolate Stout Cake

Saturday, December 10, 2011


Things have been super busy this quarter and as you can see by the frequency of my posts, it's been a while since I've had the chance to bake.  But, there was a need with it being one of my best friend's birthdays.  I missed his birthday last year as a result of being abroad, so I decided I need to make up for it this year in the form of a cake.  Since the birthday I'd missed was his 21st, I thought I'd make this cake to show Kyle that I hadn't forgotten that I still owed him a drink. The resolution: make a chocolate stout cake.

In addition to being pretty delicious and quite moist (I am always afraid of overbaking cakes) it was pretty simple to make. It also looked pretty nice, that is until I decided to add some lettering to the cake. I tried to practice beforehand, but my lettering still needs some work (there's a reason the lettered version isn't up here). I guess I'll just have to keep making birthday cakes in order to improve!

Chocolate Stout Cake (Lightly adapted from the Smitten Kitchen)
Ingredients:
1 cup stout beer (such as Guinness)
1 cup (2 sticks) unsalted butter
3/4 cup unsweetened cocoa powder (preferably Dutch-process)*
2 cups all purpose flour (I used half whole wheat flour and half all purpose since it was all we had)
2 cups sugar
1 1/2 teaspoons baking soda
3/4 teaspoon salt
2 large eggs
2/3 cup sour cream (I used 1/3 cup plain yogurt and 1/3 cup crème fraiche because it was also all we had)

*Recipes always say this and I always ignore it because I don't have the money to buy Dutch-process and my co-op has a perfectly acceptable billion pound bag of cocoa. But one day, I'll buy it. If you do use Dutch-process cocoa, let me know how it works out.

Directions:
Preheat oven to 350°F. Butter or spray a bundt pan well; make sure you get in all of the nooks and crannies. (Some people even go so far as to brush the inside of their bundt pans with melted butter–you cannot be too careful!). Bring 1 cup stout and 1 cup butter to simmer in a medium size saucepan over medium heat. Add cocoa powder and whisk until mixture is smooth. Cool slightly.
Whisk flour, sugar, baking soda, and 3/4 teaspoon salt in a large bowl. Using electric mixer, (I almost never use one and it still comes out well) beat eggs and sour cream in another large bowl to blend. Add slightly cooled stout-chocolate mixture to egg mixture and beat just to combine. Add flour mixture and beat briefly on slow speed. Using rubber spatula, fold batter until completely combined (Do not overmix!). Pour batter into prepared pan. Bake cake until tester inserted into center comes out clean, about 35 minutes. Transfer cake to rack; cool completely in the pan (be sure it's really completely cool or you might get chunks of cake stuck to your pan!), then turn cake out onto rack for drizzling ganache.

Ganache:
Ingredients:
6 ounces good semisweet chocolate chips
6 tablespoons heavy cream
3/4 teaspoon instant coffee granules (We didn't have any instant coffee, so I skipped this and just made regular ganache.)

Directions:
For the ganache, melt the chocolate, heavy cream, and coffee in the top of a double boiler over simmering water until smooth and warm, stirring occasionally. Drizzle over the top of cooled cake.

Cake Balls!

Monday, November 28, 2011


After making tons of cupcakes, I, not surprisingly, had some leftover frosting. In the kitchen, scraping out the bowl of the enormous mixer in my house, I was torn with what to do with my frosting. Meanwhile, next to me was Scott, one of my housemates and another of the dessert makers for our Special Dinner mentioned in my Coconut Cupcakes post. He was, rapidly, assembling his delicious berry trifle and said offhandedly that he had a lot of cake and didn't know what to do with it. He'd already cut the cake into small squares so simply frosting it was out, and then suddenly an it occurred to me, it was obvious. Extra cake, extra frosting, make cake balls! All I needed was the chocolate for the coating. We were all out of chocolate chips in my house so I hunted around and managed to find some extra bars of Hershey's Dark Chocolate. Perfect. Though the texture was a little bit odd because of the kind of cake I used, I wasn't sure how they would turn out. Much to my surprise, however, the reviews were awesome because according to my roommate, Joanna, “of course they'll be good, they're cake and frosting dipped in chocolate!” Good point.

A note about the recipe, I discovered it last summer when I was on a huge baking spree and decided to make some cake balls with leftover red velvet cake that didn't turn out so well (I over baked it) but in the end, the cake balls were delicious. So my conclusion, cake balls are a perfect and delicious way to correct or recycle a botched cake. Or just fun to make.

*In order to hear by email when I have posted, you can subscribe to my blog by entering your email address in the box to the right underneath my picture and profile.  I promise, you won't get spammed, you'll only get an email when I add a new post.

Cake Balls (adapted from Bakerella)
Ingredients
One 13 X 9 cake
16 oz of cream cheese frosting (see the frosting recipe from Coconut Cupcakes)
2 cups of chocolate, separated (milk, white, or dark chocolate)
Parchment paper

Directions
1. Cool cake completely and crumble into a large bowl.
2. Add 16 oz of cream cheese frosting and mix with the cake. (Even though it's messy, it's easier to mix it with your hands)
3. Roll mixture into 1 inch balls (as though you're making meatballs) and place on cookie sheet lined with parchment paper. (It should make 45-50 balls)
4. Chill for several hours. (You can speed this up by putting in the freezer.)
5. Using a double boiler, melt enough chocolate to dip half of the balls in chocolate, about a cup. Then, melt more chocolate for the rest of the chocolate balls. (I like to melt it in two batches because the chocolate firms up pretty quickly and it's difficult to work with)
6. Roll balls in chocolate and lay on cookie tray with parchment paper until firm. (Use a spoon to dip and roll in chocolate)

Coconut Cupcakes

Wednesday, November 16, 2011


Living a in a co-op has meant some pretty good meals so far this year including: bison steaks, filet mignon, smoked salmon, the list goes on. For college kids, we may eat too well. But the most amazing meal came from our special dinner. It's a dinner that on campus houses have once a quarter. Most houses have a chef and he or she will cook up amazing food like steak, lobster, tuna steaks, duck etc. It's really quite absurd. But since we're a co-op and cook everything ourselves. I wasn't exactly sure what to expect. But people really outdid themselves. Our dinner consisted of but was not limited to smoked salmon, ribs, fig and mushroom galette, risotto, two kinds of fresh bread, potato salad, hummus, tomato, mozzarella and basil, steak, prosciutto wrapped melon, tacos de lengua and al pastor, fresh bread topped with cheese and caramelized onions, salad with homemade crutons, and I'm sure I'm forgetting something else. I, of course, volunteered to make dessert. Wanting to make something fun, somewhat gourmet, and not too complicated I finally decided on making Ina Garten's (aka The Barefoot Contessa) Coconut Cupcakes. My godmother made them for the first time a few years ago and they've been in a hit in our family ever since. So I figured, why not? And in fact, they turned out pretty well. I was concerned about doubling the recipe, whether I had enough time to make them in the two hours I had before dinner (I'm now even more in awe of the people who are able to make 1000 cupcakes and put them on a stand on Cupcake Wars in just 2 hours, I think) and whether or not I would produce enough cupcakes since we were supposed to scale for 80 people instead of 40 as we do for a regular meal. But, shockingly, I ended up with 70 cupcakes which was more than plenty for the number of people at dinner who still had room for dessert after dinner and chose my cupcakes over the delicious berry-rum trifle and strawberry shortcake. They were also fun to make and I got to use a pastry bag to pipe the frosting out onto the cupcakes which made them look (I hope) pretty classy.

Coconut Cupcakes (by The Barefoot Contessa)
Ingredients:
3/4 pound (3 sticks) unsalted butter, room temperature
2 cups sugar
5 extra-large eggs at room temperature
1 1/2 teaspoons pure vanilla extract
1 1/2 teaspoons pure almond extract
3 cups flour
1 teaspoon baking powder
1/2 teaspoon baking soda
1/2 teaspoon kosher salt
1 cup buttermilk
14 ounces sweetened, shredded coconut

Directions:
1) Preheat the oven to 325 degrees F.
2) In the bowl of an electric mixer fitted with the paddle attachment, cream the butter and sugar on high speed until light and fluffy, about 5 minutes. With the mixer on low speed, add the eggs, 1 at a time, scraping down the bowl after each addition. Add the vanilla and almond extracts and mix well.
3) In a separate bowl, sift together the flour, baking powder, baking soda, and salt. In 3 parts, alternately add the dry ingredients and the buttermilk to the batter, beginning and ending with the dry. Mix until just combined. Fold in 7 ounces of coconut. (A bit less could be used)
4) Line a muffin pan with paper liners. Fill each liner to the top with batter. (I would suggest filling just 2/3 of the way full, you get more cupcakes and if you fill them to the top they'll overflow) Bake for 25 to 35 minutes, until the tops are brown and a toothpick comes out clean. Allow to cool in the pan for 15 minutes. Remove to a baking rack and cool completely.

Frosting
Ingredients
1 pound cream cheese at room temperature
3/4 pound (3 sticks) unsalted butter, room temperature
1 teaspoon pure vanilla extract
1/2 teaspoon pure almond extract
1 1/2 pounds confectioners' sugar, sifted

Directions
In the bowl of an electric mixer fitted with the paddle attachment, on low speed, cream together the cream cheese, butter, and vanilla and almond extracts. Add the confectioners' sugar and mix until smooth.
On a rimmed baking sheet, evenly spread the remaining coconut and toast, in the oven, until lightly golden.  Frost the cupcakes and sprinkle with the toasted coconut.

Lemon Butter Cookies

Sunday, November 6, 2011


A few weeks ago we had our first progressive in our new on-campus house. Our staff pleaded for people to make food, and not just drinks, so my roommate, Joanna, and I happily obliged. Not having ordered any ingredients for our cookies we decided to just make something that we had the ingredients for in the house. Coincidentally, someone had bought cake flour from the store on just that day so we decided to use it, against the advice of one of the best cooks in the house. It turned out just fine and in fact, making the orange (original) version of these one day this summer, I used regular flour and it produced equally good results. So don't worry, if you have some cake flour to spare, by all means use it, if not they'll still come out beautifully. In any case, our wonderful new house, which is actually a co-op, was filled with all the ingredients we needed, including the lemons we used which were provided by our own lemon trees! We also decided to put a little twist on these cookies and were going to turn them into thumbprint cookies but discovering the softness of the dough (these cookies spread a lot) we decided to just simply frost them with some of the delicious jams we have in the house. A thin layer of raspberry or blackberry jam made for delectable little cookies which our housemates raved about. I also think you could make these in so many ways with all different types of citrus and even have lemon cookies with lime frosting, etc. The possibilities are endless!

Lemon Butter Cookies (adapted from The New York Times)
Yield: About 4 dozen cookies (or maybe 5 dozen if you make them as small as we did)
Ingredients
1 3/4 cups unbleached all-purpose flour
1 2/3 cups cake flour or more all-purpose flour (cake flour gives a finer texture)
1/2 teaspoon baking soda
1 teaspoon kosher salt
1 1/4 cups granulated sugar
1 cup (2 sticks) cold unsalted butter
2 packed teaspoons freshly grated lemon zest
1 large egg plus 2 large egg yolks, at room temperature

Directions
1. Position two oven racks in top and bottom third of oven. Preheat oven to 350 degrees. Line two cookie sheets with parchment paper.
2. In a bowl, whisk flours, baking soda and salt together. In a mixer, cream together the sugar, butter and orange zest at medium speed until light and smooth, about 3 minutes. Scrape down the sides of bowl frequently. Add egg and mix. Add one egg yolk and mix. Add remaining egg yolk and mix. Stir in dry ingredients just until combined.
3. Scoop tablespoons of dough onto parchment, leaving more than 1 inch between cookies. Press each one down lightly with 2 fingers to flatten to a thickness of 1/2 inch. Leave any ridges and valleys on top of cookie intact, but smooth the edges.
4. Bake about 15 minutes, rotating cookie sheets halfway through. Cookies should be pale but baked all the way through. Cool on sheets 5 minutes, then transfer to a rack and cool before storing in airtight containers up to 1 week.

Icing
Ingredients
1 lemon
1 1/2 cups confectioners’ sugar
2 to 4 tablespoons whole milk
2 drops almond or vanilla extract
Pinch fine salt.

Directions
1.Bring a small pot of water to a boil. Peel orange, being careful to remove only outer lemon zest, and cut into thin strips. Blanch in boiling water 1 minute; drain.
2.Sift confectioners’ sugar into a bowl. Whisk in 2 tablespoons milk. Whisk in more milk if needed to make mixture thin enough to spread.
3. Add extract, salt and zest, and whisk to combine.
4.Place cookies on a rack and drizzle icing over each one (make sure there is some lemon zest in each spoonful). Icing will settle into cookie crevices; let harden.
Note: Instead of icing, cookies can be sprinkled with coarse crystal sugar before baking.
Or you can do what we did and spread them with a thin layer of raspberry or blackberry jam.

Chocolate Shortbread Sandwich Cookies with Vanilla Frosting

Monday, October 31, 2011


My friend, Micah, concluded the other day that if I ever have a significant other and fight with him, our fights will go something like this "No, insert name, you're not frosting those cookies right". I didn't dispute his claim then and I certainly can't dispute his claim now because that's exactly what happened to Micah when I was making these cookies. Poor Micah, he was just trying to help. But I, as always, wanted my cookies made exactly according the the recipe, down to the round cookies which are shown in the picture. The idea of making round cookies with few kitchen supplies brought up yet another kitchen gadget I need to invest in. Cookie cutters. Oh well, I got by anyway using the round top of my newly purchased vanilla bean paste and a knife to cut circles around it. To my shock and pleasure the cookies came out pretty well, nice and round. And I filled them with frosting just the way I wanted them. And I must say, it looks a little better to have piped the frosting into the middle of these cookies than to have spread it. Plus it was more fun. For me at least. Sorry Micah.

A note on the frosting, though it calls for just a small amount of butter and if the butter is not completely melted, this will not turn into frosting. Just chunks of butter and confectioners sugar. Normally, I would have added a bit of milk to it to make it work but having no milk in the house I had to add some extra melted butter.  (I know I know, more butter, not good) But, after that, it turned out just fine.  Also, aside from using the top of the vanilla paste I recently bought, is used it to make this frosting amazingly delicious and vanilla-y.  It also lent flecks of vanilla to the frosting which are hard to make out in the picture but looked really nice, and gives the impression that you used a real vanilla bean.  I highly recommend it.

I also want to add that the perks of working for a winery just never end, I found this recipe on the website of another winery which I wouldn't have know about otherwise. On their website they have all kinds of delicious looking gourmet recipes with beautiful pictures and selections for wine pairings, though you should really try to pair your creations with our Kingston Family Vineyards wines! (Shameless plug)

Chocolate Shortbread Sandwich Cookies with Vanilla Frosting (adapted from Robert Sinskey)

Ingredients:
1 stick unsalted butter, room temperature
1/2 cup powdered sugar, sifted
1/2 teaspoon pure vanilla extract
1/3 cup Dutch processed or natural cocoa powder, sifted (I think we may have just used Hershey's)
3/4 cup all-purpose flour
1/2 teaspoon kosher salt

Directions:
1. Preheat the oven to 350 degrees F.
2. In a stand mixer, fitted with a paddle attachment, or just using a regular hand mixer, ream the butter until fluffy, about 3 minutes. Add the powdered sugar and beat until fluffy again. Add the vanilla extract to the mixture and then the cocoa powder. Beat until combined.
3. Scrape down the sides of the bowl. Add the flour and salt and mix gently until incorporated. The dough will be very soft and slightly sticky. Knead the dough two or three times on a lightly floured board to incorporate all the ingredients. Wrap the dough in plastic wrap and chill for 40 minutes or until no longer soft. 
4. Remove the dough from the refrigerator.  Place the dough on a floured surface and roll 1/8 thick.  (Though this may seem extremely thin, it's important because the cookies will puff up and if you make them too thick you'll end up with super fat sandwich cookies instead of the thin, delicate ones pictured here)  Using a round cookie cutter, punch out shapes.  Transfer to a parchment lined sheet pan.
5. Bake for 12 to 15 minutes . Remove the cookies from the baking sheet and cool on a rack.
6. Make sure the shortbread is thoroughly cool before filling. To fill, put the vanilla cream filling into a pastry bag with a number 6 plain tip or a plastic bag with the tip of a corner cut off so that the opening is 1/2-inch wide.
6. Line up 16 cookies so that the side that was baked against the pan is facing up. Starting with one cookie, pipe a thick ring about 1/8 of an inch from the edge of the cookie. Fill in the center of the ring with a dot of filling and place another cookie on top of the filling. Press lightly until the filling oozes almost to the edge of the cookie. Repeat with the remaining cookies.

Vanilla Cream Filling
Ingredients:
4 tablespoons (1/2 stick) unsalted butter, room temperature
1/2 teaspoon pure vanilla extract (I used some vanilla paste)
1/8 teaspoon kosher salt
1 cup plus 2 tablespoons powdered sugar

Directions:
1. Place all the ingredients in the bowl of a stand mixer fitted with a paddle attachment.
2. Start on slow speed to combine the ingredients, and then increase the speed to high and beat until the filling is very white and fluffy, 3 to 4 minutes.
3. Place the filling in a piping bag or plastic zip lock bag with the corner cut off to pipe into cookies. The leftover filling may be chilled and reused again. Wrap very tightly and store in the refrigerator. To reuse, bring to room temperature and then whip until fluffy again.

Chinese Scallion Pancakes (Finally, something not a dessert!)

Saturday, October 1, 2011


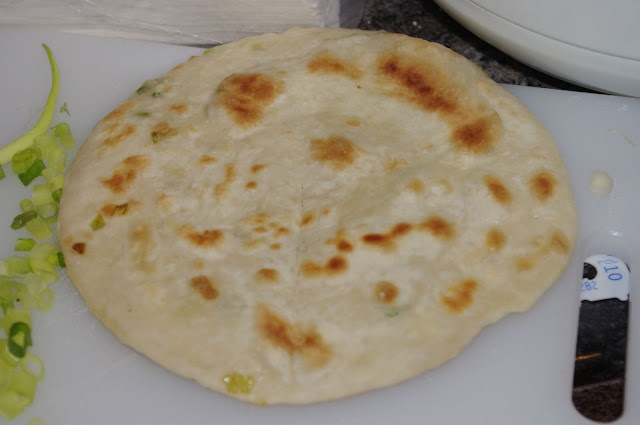
The other day, Dan sent me a message and a link for making these flaky fried pancake things that we had tried.  He bought them and they were delicious so I was excited to make them myself.  Rolling them out reminded me of making tortillas with my grandmother and I was so proud that after a few tries I was able to make these great pancakes into perfect round circles.  A far cry from the Africa shaped tortillas we used to make with her.  Too bad they weren't her tortillas though. Or maybe not, because they were good but perhaps not nearly as bad for you as her tortillas.  That is until you fry these things.  Not in too much oil but enough to make these completely unhealthy for you.   Oh well.   In any case, the sauce for these is really what made them.  The girl who wrote this recipe sort of offhandedly wrote down some ratios of what to what would make a good sauce, and boy were her estimations right on.  So when making these, definitely don't forget the sauce or you'll be missing something.

Chinese Scallion Pancakes (adapted from Sel et Sucre)
Yield: 6 pancakes
Ingredients
2 cups flour
1/4 cup warm water + more as needed
the green parts of 1 bunch scallions, finely chopped
vegetable oil
kosher salt

Directions
1. In a large bowl, mix 2 cups flour with 1/4 cup warm water, and stir until water is absorbed. Continue adding more warm water one teaspoon at a time, mixing thoroughly, until dough pulls away from the sides of the bowl. The dough should be firm and barely sticky to the touch.
2. Knead the dough about twenty strokes, then cover with a damp towel for 15 minutes.
3. Divide the dough until 5 or 6 equal pieces and roll each piece into a ball.
4. Place a ball of dough on a well-floured work surface and roll out into a thin circle, approximately 1/16th inch thick. (this part was a bit tough for my weak arms!)
5. Brush a thin coating of vegetable oil over the pancake. Sprinkle kosher salt (be sure not to forget the salt! I did and some weren't as tasty) and about 1 – 2 Tbsp of the green parts of 1 bunch scallions, finely chopped evenly over the pancake.
6. Roll the pancake up from one end like a rug, then curl the roll around in a spiral and pinch the end to the roll so it stays wrapped.*
7. With the palm of your hand, press the roll from the top to flatten it. Roll the pancake out to 1/8th inch thickness (some scallions may break through the pancake, but that’s okay).
8. Repeat this process for the remaining pancakes. If you are not planning on cooking the pancakes right away, stack them between wax or parchment paper and store in a gallon bag in the freezer until ready to cook. The frozen pancakes do not need to be defrosted before being cooked.
9. To cook the pancakes, coat a pan with vegetable oil and heat over medium heat. Cook each pancake in the oil, frying each side until golden brown, adding more oil as needed. Serve warm with a dipping sauce.*

*This is difficult to explain without pictures, so I would go here to see the step photos of the assembly.

Dipping Sauce
Ingredients
2 tablespoons Soy Sauce
1 tablespoon Rice Vinegar
1 tablespoon brown sugar (trust me, it tastes good)
A dash of sesame oil
Leftover scallions

Directions
1) Combine all ingredients in a small bowl and whisk with a fork.
2) Serve with the warm Chinese Scallion Pancakes.

Kingston Family Vineyards Bayo Oscuro Syrah and Chocolate Cupcakes

Monday, September 26, 2011


I don't make cakes. As you can probably see from this blog thus far, my propensity for making cakes, well...let's just say it doesn't exist. In fact I might as well have been la hija del Monstruo de las Galletas. Because that's what I make. Cookies. Cookies, cookies, and more cookies!

But not for my friend Micah's birthday. Cookies would never do. It would have to be a cake. And since it was his 21st birthday, preferably a cake with alcohol. I toyed with doing a rum cake, but then I remembered the recipe for Bizcocho al vino tinto which I saw on Mercado Calabajío last summer. I had really wanted to make it then but, the problem was, I didn't have any wine last summer. Luckily that was cured by my employment by a winery this summer.  Kingston Family Vineyards to be exact! And suddenly there was wine. Very good wine.

So I decided to use some for Micah's 21st birthday cake. But measurement conversions are always difficult from the metric system or the way they make things in every other country but the U.S. (or at least I think, maybe Canada uses cups...) In any case, I'm still not exactly sure, by weighing everything I guess, a phenomenon which I never witnessed in Spain, no doubt due to the fact that my host mom was no baker. In fact there were no sweet things in the house unless I baked them. Just these sort of orange flavored cookies which said “Digestive” on them. But I digress.

In any case, Micah's birthday cake, sad to say, was something of a disaster. It looked pretty good, but looks are deceptive. The batter was too dry and then I over baked the cake. On top of that the chocolate wine ganache simply didn't taste anything like wine and there wasn't enough of it. Sigh. Not one of my finer baking moments.

However, I was determined to get it right to share it with my wonderful coworkers at Kingston! So, for my last couple of days at the winery, I decided to make this cake in cupcake form and do things a bit differently. I added a bit more wine to the batter, I fluffed the egg whites more (aka I followed the directions better), I made a red wine reduction for the ganache and I doubled the ganache recipe. Wow. Lots of corrections. And low and behold, the cupcakes (unlike the original cake) came out stellar. There were rave reviews all around! I think I got it right this time!

Kingston Family Vineyards Wine Cupcakes (based on Bizcocho al vino tinto by Mercado Calabajío)
Ingredients
4 eggs
1 cup of cocoa powder (I used Hershey's)
1 cup of flour
14 tablespoons of softened butter (awkward amount, I know)
3/4 cup of red wine (preferrably Kingston Family Vineyards  Bayo Oscuro Syrah!) :)
3/4 cup of sugar
1 tablespoon of baking powder

Directions
1) Preheat the oven to 350ºF
2) Separate the egg whites and the egg yolks into two separate mixing bowls.
3) Using a hand mixer (or a stand mixer if you're lucky enough to have one!) whip the egg whites until they are almost snow-like but haven't yet turned into meringue. (I suggest looking at the pictures on Mercado Calbajío for points of reference, even if you can't read Spanish)
4) Add the sugar to the egg yolks and mix with a fork.  Then, a little at a time, mix in the very softened (but not melted) butter.
5) Add the egg whites to the egg yolk mixture and mix well.
6) Next, add the cocoa powder and mix before adding the wine.
7) Combine the flour and baking powder in a small bowl and add to the cocoa mixture a bit at a time until just incorporated. Be careful not to overmix!
8) For the cupcakes, line a muffin tin with cupcake liners and fill each one about 2/3 of the way full. Or if you're making a cake (and I add this sheerly because I find it entertaining), butter or spray a 9inch round pan with cooking spray (a "great invention" which it seems they have only just discovered in Spain based on Mercado Calabajío's comments and the suggestion of buying it on theamericastore.com)
9) Bake for 10-15 minutes or until a toothpick inserted in the middle comes out with just a few crumbs.

Kingston Family Vineyards Wine Ganache (based on the ganache for Brownies with Chocolate Wine Ganache by Diana's Desserts)
Ingredients
10oz dark chocolate (I used a bag of Ghirardelli bittersweet chocolate chips)
1/2 cup of red wine
6 tablespoons of cream

Directions
1) In a small saucepan, reduce 1/2 cup of the same wine you used in the cupcakes, to two tablespoons.  Or, you can just add 2 tablespoons of the red wine instead of reducing it. Though it lends a different flavor to the chocolate ganache, it's still good.
2) Whisk all ingredients in small saucepan (or double boiler) over medium-low heat until melted and smooth.
3) Remove from heat and set aside.  Allow the ganache to solidify a bit before pouring or scooping a generous amount onto the top of the cupcakes.
4) Let the ganache set up, preferrably overnight, before serving.
5) Enjoy as your friends, family, and coworkers ooh and aww over the decadence of these cupcakes.

Chewy Chocolate White Chocolate Chunk Cookies

Thursday, September 22, 2011


It was a long Sunday at work and all I wanted to do was sit down. But Micah reminded me that we had lots of ingredients to get through before the end of the summer when my friends move out of their house and go home for the month before school starts. We started halfway through the summer with a ten pound bag of sugar which Micah invested in. Sadly got down to just three or four pounds. I'd like to say that lots of it was wasted on experiments that went wrong but I'd guess that those uneaten experiments account for just 4 or 5 cups of that sugar. At the most. Meaning we consumed the rest and are still continuing to consume it.

Fortunately, it was not I who was eating these cookies but my coworkers. I decided that since my boss is always bringing in food for us (and I am always eating it) that I should bring something for my coworkers. After all, I bake all the time, why not? So I took about 14 cookies (which sparked outrage from Micah who thought I was stealing all his cookies) and which made me think that with just three other coworkers I would have enough after work to take home to my aunt and even take some to another friend. Wrong. These cookies were devoured. My boss marveled at the texture of them and a coworker asked me if they were from a box. To which my boss said, “I'm really good at making those slice and bakes, I know exactly how long to bake them for.” Sigh. Someone needs to teach him how to cook. In the mean time, I think I'll try to keep bringing cookies.

These are super dense chocolate cookies even without using Dutch press cocoa or the Hershey's special dark cocoa powder that some other bakers like the Brown Eyed Baker or Two Peas and their Pod suggest but the white chocolate chips seemed to balance the chocolate out nicely.

Chewy Chocolate White Chocolate Chunk Cookies
Ingredients
1-1/4 cups flour
1 teaspoon baking powder
1/2 teaspoon salt
2/3 cup dutch-process cocoa* ( we used regular Hershey’s)
1/2 cup (1 stick) unsalted butter, cubed and room temp
1/2 cup white sugar
1/2 cup dark brown sugar
1-1/2 teaspoons vanilla
1/3 cup milk
1-1/2 cups chopped white chocolate (we used white chocolate chips)

*Substituting with natural unprocessed cocoa is not recommended. The Oreo-like flavor comes from the richer dutch-processed cocoa. (We didn't really care about the oreo cookie flavor so we just skipped the expensive dutch press cocoa and used Hershey's, we're college kids, come on.)

Directions
1)Preheat oven to 325 degrees F and line baking sheets with silicone baking mat or parchment paper.
2)Whisk together flour, salt, baking powder and cocoa, and set aside. Beat the butter on medium-high until light and add sugars, creaming well. Add the vanilla and beat until smooth. Add the flour mixture in 2 batches, alternately with the milk in one batch, mixing well. Chill dough for 15 minutes.
3)Scoop the dough onto a parchment (yeah parchment! great investment)- or silpat-lined cookie sheet, press down on them slightly, and bake for 13-15 minutes. Let the cookies cool completely on the cookie sheet and store in an air-tight container.
4) Share with coworkers! (and don't plan to have leftovers)

World Peace Cookies (And the run to the finish in the summer cookie spree)

Friday, September 16, 2011


A couple of Sundays ago, I returned home to my friend's house to find them all playing video games (surprise!) and joined them in sitting on the couch. Then suddenly the video games became a truly awful movie which sadly featured James Franco, Natalie Portman, and Zooey de Chanel, among others. Not wanting to watch it, and instead wanting to take advantage of all the ingredients we had to use up in my friends' summer house before they move out, I was relieved when Micah asked if I would want to make something. “You don't want to watch this?” I asked laughingly, to which I received a look which clearly said, no. Heck no. So we left the showing of the dreadful movie and go to work on these World Peace Cookies.

After making these cookies, I'm really unsure as to why we were not constantly stocked with parchment paper this summer. For the first time all summer, the bottoms of our cookies were not burned, even with our not so good baking sheets. It was amazing! All thanks to Simon who had the impulse to make toffee and ended up purchasing not just parchment paper but a candy thermometer. Now maybe we can make the delicious Brown Sugar buttercream frosting my sister told me about or even tempered chocolate for these amazing looking chocolate cups we've been wanting to make! Anyway, back to these cookies. So while I don't quite think they'll bring world peace with their deliciousness, they were pretty good and as Micah said, it was just what he wanted.

A note: Though it says you should refrigerate these for 3 hours before slicing and baking, in our eagerness to eat these cookies we skipped this step and simply made the cookies of flattened down balls of dough. (Lets be real, Micah wanted his chocolateness and he wanted it now so he put these cookies in the freezer to cool them down faster).  Despite our shortcut methods, they still tasted delicious to me and I liked the fact that they didn't have the store-bought slice and bake look of the cookies when I made them last summer. Plus we got to eat them sooner. Win on all fronts.

World Peace Cookies (found in many locations on the web but we found it here)

Ingredients
1 1/4 cups all-purpose flour
1/3 cup unsweetened cocoa powder
1/2 teaspoon baking soda
1 stick plus 3 tablespoons (11 tablespoons) unsalted butter, at room temperature
2/3 cup (packed) light brown sugar
1/4 cup sugar
1/2 teaspoon fleur de sel or 1/4 teaspoon fine sea salt (this is essential)
1 teaspoon pure vanilla extract
5 ounces bittersweet chocolate, chopped into chips, or a generous 3/4 cup store-bought mini chocolate chips (we used regular chocolate chips and it worked fine though I suppose if you're slicing these it might be better if they're smaller...)

Directions
1) Sift the flour, cocoa and baking soda together. (I'm always too lazy to sift so I skipped the sifting and just mixed these dry ingredients together before adding them in step 3)
2) Working with a stand mixer, preferably fitted with a paddle attachment, or with a hand mixer in a large bowl, beat the butter on medium speed until soft and creamy. Add both sugars, the salt and vanilla extract and beat for 2 minutes more.
3)Turn off the mixer. Pour in the dry ingredients, drape a kitchen towel over the stand mixer to protect yourself and your kitchen from flying flour and pulse the mixer at low speed about 5 times, a second or two each time. Take a peek — if there is still a lot of flour on the surface of the dough, pulse a couple of times more; if not, remove the towel. Continuing at low speed, mix for about 30 seconds more, just until the flour disappears into the dough — for the best texture, work the dough as little as possible once the flour is added, and don’t be concerned if the dough looks a little crumbly. Toss in the chocolate pieces and mix only to incorporate.
4) Turn the dough out onto a work surface, gather it together and divide it in half. Working with one half at a time, shape the dough into logs that are 1 1/2 inches in diameter. Wrap the logs in plastic wrap and refrigerate them for at least 3 hours. (The dough can be refrigerated for up to 3 days or frozen for up to 2 months. If you’ve frozen the dough, you needn’t defrost it before baking — just slice the logs into cookies and bake the cookies 1 minute longer.) (As previously mentioned, we were too lazy to do this)

Baking preparations
1) Center a rack in the oven and preheat the oven to 325 degrees F. Line two baking sheets with parchment or silicone mats.
2) Using a sharp thin knife, slice the logs into rounds that are 1/2 inch thick. (The rounds are likely to crack as you’re cutting them — don’t be concerned, just squeeze the bits back onto each cookie.) Arrange the rounds on the baking sheets, leaving about 1 inch between them.
3) Bake the cookies one sheet at a time for 12 minutes — they won’t look done, nor will they be firm, but that’s just the way they should be. Transfer the baking sheet to a cooling rack and let the cookies rest until they are only just warm, at which point you can serve them or let them reach room temperature. (or put them in the freezer if you're impatient...)

Sheer Deliciousness

Thursday, September 8, 2011


I knew that the spice mill I bought (aka a cheap coffee grinder) would come in handy again. This time it was not used for spices but to puree the beautiful raspberries which I used in this delicious cupcake recipe. The other day Micah said he had extra raspberries (Who ever has extra raspberries? this concept is totally foreign to me) and he wanted a recipe to use them up so he asked me to find one. This cupcake recipe was just the right thing. We had all of the ingredients minus a little powdered sugar and more berries. So Micah and I went down the road to this little store that sells all kinds of fruit. It's great, a classy version of a roadside stand they also sell cheese, bread, baked goods, and dried fruit and nuts. Amazing. And that's not the best part. They have samples. Of everything. You can try literally every fruit you're thinking about buying. Plus most of the vegetables. So I naturally tried every fruit in the place and the berries we ended up buying, several times. Then we brought home our wares and began making these delicious cupcakes. The one thing that bothered me is that the frosting didn't have quite the consistency it was supposed to. It was a little too runny. But no matter, these cupcakes still taste absolutely amazing. We baked them just right, a first, in this oven, and they're soft and beautiful on the inside. Sure, they're not that pretty and Micah wouldn't let me add more than a pound of powdered sugar to the frosting (which calls for 1-3lbs) citing the fact that we were going to get diabetes if we added more so I relented and we didn't. It also made the berry flavor a bit more intense so I guess that was good.

Fresh Berry Cupcakes (from The Cooking Photographer)

Use the best quality berries you can get. They are the stars in these moist cupcakes. By letting the berry puree macerate for a day, the sugars will release making these cupcakes much better. (I skipped this step but the cupcakes were still delicious)

Ingredients
2/3 cup whole fresh or frozen strawberry puree, or any berry of choice pureed with juices
1/2 cup (1 stick) unsalted butter, very soft
1 cup granulated sugar
1/4 teaspoon salt
2 large eggs
1 teaspoon pure vanilla extract
1/8 teaspoon almond extract
1/4 cup half & half or whole milk
1/3 cup cornstarch
1 teaspoon baking powder
1 ¼ cups unbleached all-purpose flour

Instructions
1. Gather enough thawed or fresh berries to make the puree plus more for the frosting (below). Then completely process the berries in a food processor (or a bit at a time in a coffee grinder, sacrilege, I know) and store in a covered bowl in the refrigerator for a day to let the sugars release. If using berries with seeds like raspberries or blackberries, strain the puree through a fine mesh sieve before refrigerating.

2. Preheat the oven to 350 degrees. Line a muffin tin with 12 muffin liners, or lightly butter and flour the tin.

3. In a stand mixer, or with a hand mixer and a large bowl, beat the butter, sugar, and salt together until mixed well. Then add the eggs, vanilla extract, and almond extract and beat until mixed well. Add the half & half or milk and berry puree and beat until mixed. Add the cornstarch and baking powder and mix to incorporate. Then add the flour and beat on medium speed for 30 seconds.

4. With an ice-cream scoop, divide the batter among the muffin tins. Bake for 20 to 22 minutes or until no longer wet looking and comes free of crumbs when tested with a toothpick.

5. Cool completely before frosting.

Strawberry or Any Berry Frosting 
Frosting can be as thick and dense or as fluffy and light as you like by adding more or less powdered sugar. Play around with the amount and see what works for you. (As previously mentioned, we used just a pound of powdered sugar)

Ingredients
1/2 cup (1 stick) unsalted butter, very soft
¼ cup cream cheese, very soft
1/8 teaspoon salt
1/3 to 1/2 cup of the strawberry/berry puree to taste
1/4 teaspoon pure vanilla extract
1/8 teaspoon almond extract
1/8 teaspoon strawberry extract (Use only if your frosting needs a little more flavor, hopefully you won’t need it)
Powdered sugar, between 1 and 3 pounds depending on consistency preferences

Instructions
1. With a stand mixer or a hand mixer, beat all the ingredients together adding the powdered sugar a few cups at a time until desired consistency is reached. Berry flavor will come out even more after sitting for a bit. Flavor with strawberry extract only if needed. (We didn't need any because our berries were so good) Use immediately and store extra covered in the refrigerator.

2. To frost these, I filled a plastic bag and with frosting and cut off a corner to create a hole about ¾ of an inch wide.  I then pressed a large dollop of frosting onto the middle of the cupcake and then followed the instructions of the Cooking Photographer to gently tilt the cupcakes so the frosting would be moved to the edges. Which it did since it was a bit thin.

3) Top with a fresh raspberry for decoration. Success!

Crostini with Brie and Tomatoes

Friday, September 2, 2011


It was a Friday evening and my friend Dan and I had decided to make dinner. We all needed a trip to the store so Dan, Manoli, and I all jumped in the car and headed to Safeway. Wandering around for a bit, not sure of what to make that would not cost me very much money, I settled on sweet potatoes for sweet potato fries and a thin loaf of bread to make crostini. Pretty cheap. I then decided to make use of the beautiful heirloom tomatoes my boss had so generously given me, and the brie cheese which Dan had donated to me, in order to make us some appetizers while Dan prepared the real meal. Not everyone was a fan (Manoli doesn't like brie and Micah doesn't like tomatoes) but I think Dan and I enjoyed them. Or at least I did. Well anyway, I thought they were good and they were super simple as a nice appetizer...

Crostini with Brie and Tomatoes

Ingredients
Crostini
8 slices of french bread
8 slices of brie cheese

Tomato topping
1 fresh tomato, diced
2 teaspoons parsley
1 teaspoon oregano
2 teaspoons olive oil
Salt and pepper to taste

Directions
1) Preheat the oven to 375º F.
2) Slice the bread on the diagonal, into ½ inch slices. Top with a piece of brie cheese. Place baguette slices face side up on a baking sheet. Bake for 4-5 minutes, or until the brie is melted. Remove from oven.
3) Combine all Tomato topping ingredients in a small pan over medium-high heat. Simmer for about 3 minutes. Remove from heat.
4) Top crostini with about 1 tablespoon of the tomato. Serve immediately.


Gnocchi Parisienne

Sunday, August 28, 2011


As for the gnocchi, which I made on the same night as the Chocolate Cookies with Grapefruit and Star Anise, I would recommend them to anyone, with a couple notes. The gnocchi turned out surprisingly well and the recipe was very easy to follow releasing us with hundreds of pillowy gnocchi which we sprinkled with parmesan cheese. But, as Micah pointed out, it was missing something. Meat. Usually, I eat pasta by itself, but for some reason I felt as though this dish did need some meat and the duck confit they suggested as one of the alternative ways to make it, sounded pretty amazing. Unfortunately, I don't think duck confit will be appearing to me any time soon so the next time I make these gnocchi I think I'll make them either as a side dish or with some chicken or pork. That being said, though not traditional gnocchi since we didn't make them with potatoes, these gnocchi were delicious and not too hard to make.

Gnocchi Parisienne
(recipe found in Robert Sinskey Vineyards Book) apparently goes well with Pinot Noir (oh the perks of working for a winery)
Serves 4-6

Ingredients
1 ¼ cup water
10 tablespoons (1 ¼ sticks) unsalted butter; pluss additonal for serving
2 ½ teaspoons salt
1 ¼ cup all-purpose flour
5 large eggs
¼ cup finely grated Parmesan plus additional for serving
2 tablespoons finely chopped flat leaf parsley

Directions
1) Bring the water, butter and salt to a boil in a medium saucepan.
2) Remove the pan from the heat and add the flour
3) Return the pan to medium high heat and stir until batter pulls away from the side of the pan. Scrape into the bowl of a standing mixer. Turn the mixer on and allow the paddle to cool the dough slightly for about a minute
4) On low speed, add the eggs one by one. After each egg is added increase the speed to medium and beat until the egg is incorporated. The eggs may also be beaten in by hand. Beat well after all eggs have been added. (We, or Dan rather, beat it by hand and it worked fine)
5) Add the grated cheese and herbs. Beat until well incorporated.
6) Spoon the batter into a large piping bag fitted with a ½ inch wide tip. Place a rubber band tightly around the open end of the bag to prevent the batter from squishing out the back end. (This part is critical for squeezing the gnocchi out quickly and evenly)
7) Bring a large pot of water to a boil. Squeeze the bag 6-inches from the top until about ½ inch length of batter is exposed. Dip the tip of a small knife into the boiling water and using the flat edge of the piping tip as a guide, cut the small nub of batter off the tip. Repeat rapidly until the pot is filled with gnocchi. The dough will rise quickly to the top of the pan. Let them cook for 30 seconds then scoop them out with a slotted spoon and move them to a large plate. Continue until all of the batter is used up.
8) Serve gnocchi with a generous amount of butter and finely grated Parmesan.

Variations
Brown Butter Gnocchi Parisienne:
Heat a large non-stick sauté pan over medium high heat. Add 2 tablespoons of butter and brown lightly. Add the gnocchi and sauté until golden and crisp. Serve as a side for roasted meats and chicken

Gnocchi Parisienne with Wild Mushroom and Duck Confit
Saute gnocchi as for the brown butter gnocchi. Add 1 cup sauteed wild mushrooms and 1 cup shredded duck confit at the end and heat throughly

Gnocchi Parisienne with Fried Sage and Sausage
Heat 16 large sage leaves with the butter until the butter starts to brown. Add the gnocchi and sauté until golden. Add 1 cup of crumbled cooked sweet sausage and heat throughly.

Chocolate cookies with grapefruit and star anise

Thursday, August 25, 2011


It was fate. I went home for my mom's birthday and she just happened to have star anise which I had been looking for since I saw this recipe back in February and then when I came back to California, I walked into my aunt's house to be greeted by a large grapefruit. I first thought it was a pomelo because of its size but it was grapefruit colored and then my aunt confirmed that indeed it was a massive grapefruit. The two main ingredients I had been looking for to make these cookies had simply fallen into my lap. So with my aunt out of town I asked my friends if they wanted to make dinner of Gnocchi parsisienne and then decided I would make these cookies from The Bitten Word.

While I (predictably) overcooked these cookies at first, I would suggest undercooking them because it keeps them moist and bursting with flavor. I recommend, if your friends are of the picky type, not telling them what's in these cookies. If they're picky the ingredients (namely star anise with it's licorice flavor) might turn them off. However, without knowing the ingredients, one of my friends asked if there was some raspberry in there. Yum. That being said, I don't think these cookies are for everyone since the flavor is quite unique but if you stumble on some star anise and already have a spice grinder, (which I didn't and had to make a run to the store to buy one) then I would try making these these cookies.

Chocolate cookies with grapefruit and star anise

Ingredients
8oz bittersweet chocolate, finely chopped
¼ cup (½ stick) unsalted butter, diced
1 teaspoon plus ¼ cup sugar
3 whole star anise (this produces a pretty intense flavor I might use 2 instead)
¼ cup all purpose flour
1 tablespoon unsweetened cocoa powder
½ teaspoon coarse kosher salt
¼ teaspoon baking powder
2 large eggs
2 tablespoons honey
2-4 teaspoons finely grated grapefruit peel

Directions
1) Combine chocolate and butter in medium microwave-safe bowl. Microwave in 10-second intervals until chocolate is almost melted; remove and stir until melted and smooth. Finely grind 1 teaspoon sugar and 3 star anise in spice mill or small coffee grinder. Transfer to small bowl; whisk in flour, cocoa, coarse salt, and baking powder.

2) Beat remaining 1/4 cup sugar, eggs, honey, and grapefruit peel in large bowl until thick and smooth. Fold in chocolate, then dry ingredients. Cover bowl; chill batter until cold and firm, at least 45 minutes and up to 1 day.

3) Preheat oven to 375°F. Line 3 large baking sheets with parchment paper. Drop batter by tablespoonfuls onto prepared sheets, spacing mounds 2 inches apart.

4) Bake cookies, 1 sheet at a time, until dry-looking and tester comes out with moist crumbs still attached, about 10 minutes. Cool on sheet 3 minutes, then transfer to racks and cool completely. DO AHEAD Can be made 1 day ahead. Store airtight between sheets of waxed paper

I actually think these cookies would be better with a regular cookie dough instead of chocolate. That would be an interesting thing to try...

Savory Peaches

Friday, August 12, 2011

So my mom wanted us to do something with peaches for her birthday that was neither a cobber, a pie or a tart. At a loss for what to make I eventually stumbled upon this recipe, from the guys at The Bitten Word, when searching for appetizers. It's supposed to be made with pancetta but Giant Eagle just didn't have it (shocker) so I decided to use prosciutto instead and I think it worked just as well. We got rave reviews on these and I think the sweet and salty combination along with the juiciness of the peaches was just right.

Pancetta (or Prosciutto) Wrapped Peaches with Basil and Balsamic Vinegar

Total time: 30 minutes
Serves: 4
Ingredients
16 thin slices of pancetta (or prosciutto in its absence)
2 medium freestone peaches—halved, pitted and cut into 8 wedges each
Salt and freshly ground pepper
16 basil leaves
1 tablespoon olive oil

Aged balsamic vinegar, for drizzling (I don't think ours was aged balsamic and it was fine)
Directions
1. Lay the pancetta slices out on a work surface. Set a peach wedge at the edge of each slice, season with salt and pepper and top with a basil leaf. Roll up the pancetta to enclose the peaches.
2. In a medium skillet, heat the olive oil. Add half of the wrapped peaches and cook over moderate heat, turning occasionally, until the pancetta is browned and crisp, about 4 minutes. Transfer to a platter and repeat with the remaining peaches.
3. Lightly drizzle the peaches with aged balsamic vinegar and serve.

Crème brulee for my mother's birthday

Saturday, August 6, 2011


This past weekend it was my mom's birthday. So my dad, sister, and I knew we had to make something good. Dinner consisted of Appetizers: Guacamole, Peaches wrapped in prosciutto and basil, Two sides: Jicama, Spinach, Orange Salad and yellow rice and The main dish: Chiles Rellenos. Finally we had dessert.  I was scrambling to find something and finally stumbled upon this recipe for Blackberry crème brulee by The Cooking Photographer.  It was surprisingly simple but I managed to botch it somewhat. Don't worry it still tasted good. Just be sure to follow the recipe closely and add enough water to the pan(s) and maybe turn the heat up a bit since 300ºF is barely cooking.  Be sure it's just a teaspoon of sugar on the top too. This dessert doesn't need more sugar than it already (has because of the brown sugar at the bottom) so the sugar on the top is really just for looks. Also, use fewer than 7 ramekins or have small ones because this recipe does not make much. We only had 7 (who knows why) and it was barely enough. Now, with all those instructions, I'm sure you can make it better than I did!


Blackberry Crème Brûlée with Brown Sugar Sauce
Like magic, brown sugar makes it’s own sauce on the bottom of each ramekin.

Special tools you’ll need are 8 four-ounce ramekins and a fine mesh sieve (strainer). Also, own a blow torch or set the crème brulee directly under the broiler for just a minute or two to caramelize the sugar on top (or else the crème brulee inside will melt and the four hours you chilled them for will have gone to waste). 
 
Ingredients
2 cups (1 pint) heavy cream
4 egg yolks
2/3 cup sugar
Pinch of Salt
1 teaspoon vanilla extract
About 1 cup or so fresh or frozen blackberries
8 teaspoons dark brown sugar, divided
Sugar for brûlée
Directions
1. Place 8 four-ounce ramekins in a metal 9x13-inch pan. Preheat the oven to 300 degrees and set a kettle of water to boil. (300º is barely cooking so I bumped the temperature up to 350º)

2. Place the heavy cream in a 3 quart saucepan. Cook over medium heat stirring often until just the point of boiling. Set aside.

3. Meanwhile, in a medium sized bowl whisk together egg yolks, 2/3 cup sugar, salt and vanilla extract. Whisking the entire time, slowly pour about 1 cup of the hot heavy cream into the egg mixture. Then pour the egg mixture into the heavy cream while whisking.

4. Strain the mixture through a fine mesh sieve into a large clean bowl. Place 1 teaspoon brown sugar into each ramekin. Place blackberries over brown sugar so they are nearly touching, but not packed. Slowly ladle cream mixture evenly into the ramekins, scraping all of it out of the bowl with a spatula.

5. Pull the oven rack out about half way and place the pan on it. Pour the hot water into the pan until it’s about half way up the ramekins. Bake for 35 minutes. Custards should be mainly set around the edges, but the center will still be jiggly.

6. Carefully move the custards to a cooling rack. Once cool, move to the refrigerator and chill for at least four hours.

7. To Brûlée: Sprinkle custard tops with about a teaspoon of granulated sugar and torch with fire until deeply golden brown pulling back the torch as needed so the sugar doesn’t char.

Picnic Morsels


So these tiny picnic morsels which I found on Cakespy have been on my list to make since last summer and they didn't disappoint once I finally got together all the ingredients to make them. I thought they would be rather ordinary cookies just piled with different ingredients but they were pretty good to me because of the brown sugar. This recipe uses only brown sugar and maybe it's our terrible pans but I found the brown sugar somewhat caramelized on the bottoms of these cookies adding yet another dimension of flavor to these simple little things. I also liked that they were small and bite sized but, that could be a dangerous thing too...

Picnic Morsels

Ingredients
1 2/3 cups regular flour
1/2 teaspoon baking soda
3/4 cup melted butter
1 cup packed brown sugar
1 teaspoon vanilla extract
1 egg
2/3 cup white chocolate chips
2/3 cup milk chocolate chips
3/4 cup chopped almonds
3/4 cup dried apricots, chopped

Directions
1. Preheat oven to 350 degrees.
2. In a medium bowl, stir together the flour, baking soda, and salt. In a large bowl, stir in the butter and sugar until smooth. Beat in the egg and vanilla. Stir in the dry ingredients until well blended, then add the chips, almonds, and apricots.
3. Drop dough by rounded teaspoonfuls onto an unprepared cookie sheet. Bake for 10 to 12 minutes in the preheated oven. Cookies should be golden brown. Remove from the baking sheet to cool on wire racks.
4. Enjoy, preferably at a picnic.